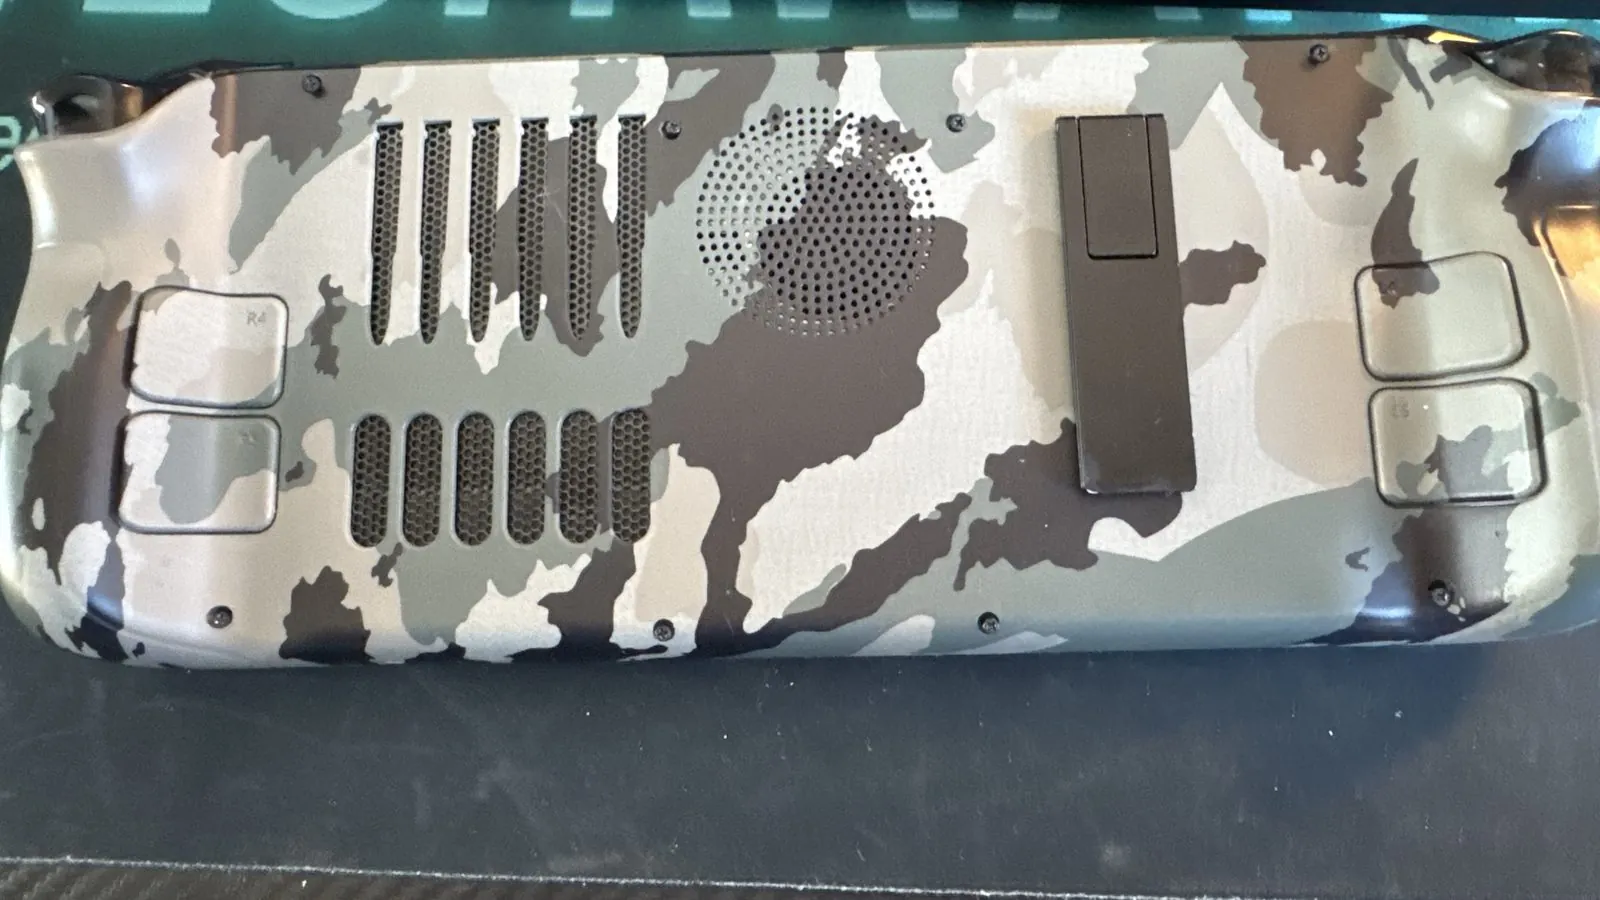
The 64GB Steam Deck is a bargain until the drive fills up. That's exactly what happened to mine. Rather than paying for a higher-capacity model, I opened it up, swapped the original 64GB module for a 1TB SSD, and while I had the back off I fitted a custom camo shell as well.
It looks like a big job. It isn't, if you go carefully. The hardware swap is a handful of screws, a plastic pry tool, and one battery plug you must disconnect before you touch the drive. The longer part is writing Valve's official SteamOS recovery image to a USB stick and putting a fresh copy of SteamOS on the new SSD.
This is how I did it, with photos at each hardware step. The software screens are shown as simple diagrams, because I wasn't about to wipe a working 1TB install just to photograph the recovery menus again.
LCD or OLED?
This write-up is for the original LCD Steam Deck, which is the one I have. The 64GB model was only sold as an LCD; the OLED models started at a much larger drive.
Mine is a refreshed LCD from early 2023: a black motherboard shield, a fan with curved sides, and only two screws holding the shield on. There is no foil tape and no hidden third screw. If your shield is metallic and has a scrap of foil tape on it, you're on the earlier 2022 design — the steps are the same, you just peel off that tape and undo one extra shield screw.
If you've got an OLED, the idea is the same (M.2 2230 NVMe, disconnect the battery, transfer the foil sleeve, re-image SteamOS), but a few important details change:
- The back cover, shield and SSD screws are T6 Torx, not Phillips. The eight back-cover screws are all the same length.
- The battery cable is reachable before you take the motherboard shield off, and you should unplug it first.
- To get the shield off you also have to disconnect a small ribbon cable to the right button board (it may be labelled C-R). Don't crease it.
iFixit has a separate official OLED SSD guide. The rest of this post follows the LCD path, which also matches iFixit's LCD SSD guide. Valve worked with iFixit on both.
What you'll need
You don't need a professional toolkit. This is what I used, and what I'd buy if I were doing it again on a budget.
| Item | What it's for |
|---|---|
| A compatible M.2 2230 NVMe SSD, single-sided, 1TB | The new internal drive. 2230 means 22 mm wide and 30 mm long. A 2242 or 2280 drive will not fit. |
| Phillips #0 and #1 screwdrivers | LCD models use Phillips screws. #1 usually fits the back cover; #0 is better for the smaller shield and SSD screws. Use the one that sits snuggest in the head. |
| A plastic pry tool or a guitar pick | For releasing the clips on the back shell. Don't use a metal screwdriver, or you'll mark the plastic. |
| A USB stick, 8 GB or larger | For Valve's official SteamOS recovery image. 16 GB is more comfortable, as the image has grown over time. |
| A USB-C hub or a USB-C stick | The Deck only has USB-C. A hub that also lets you plug in the official charger at the same time is ideal. |
| Tweezers (optional) | Only really needed if you have the earlier metal shield with foil tape over a hidden screw. |
| The official Deck case (optional) | Laying the Deck face-down in its case protects the thumbsticks and stops it wobbling. |
The drive I fitted, and some safer-known alternatives
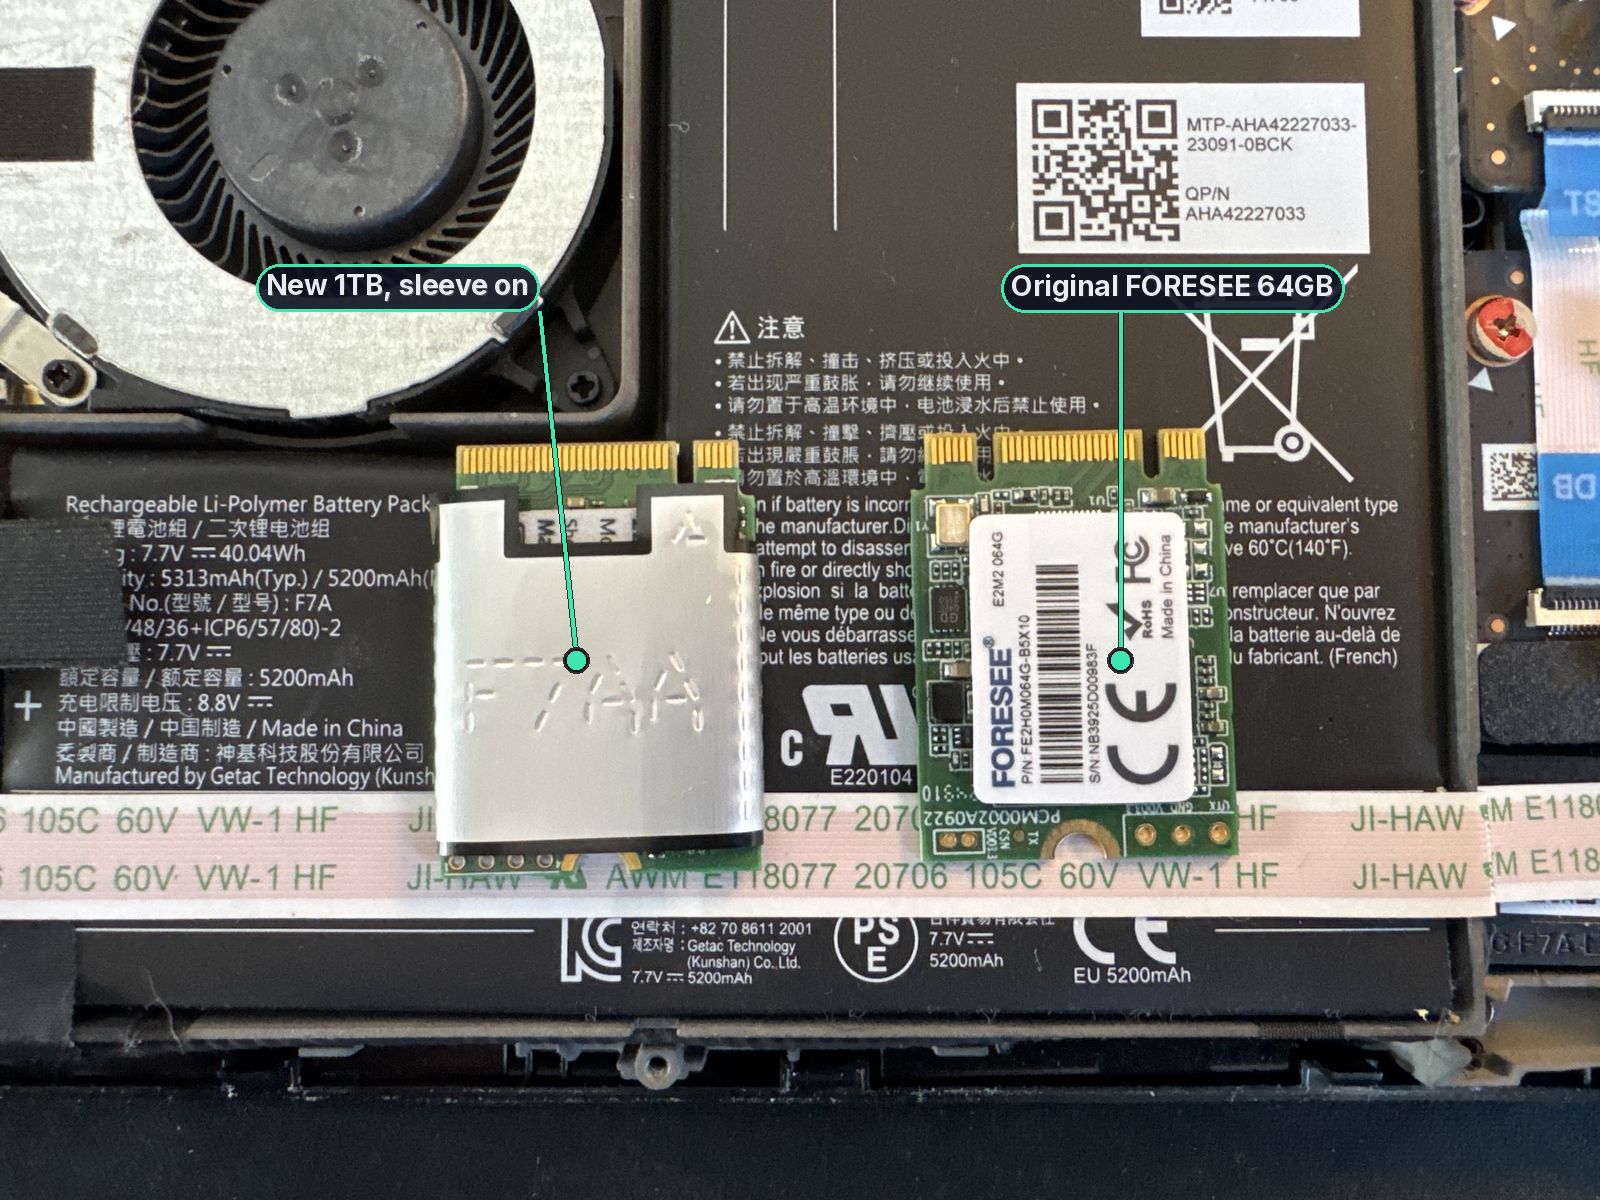
I fitted a cheap budget 1TB M.2 2230 NVMe, labelled YXNV 2230 and made by Shenzhen Electronic. It did the job, and that's the bargain-hunter in me. I don't have the receipt any more, so I won't invent a price or a shop.
If I were buying today and wanted a well-reviewed name-brand drive, these two are widely used in Steam Decks. You do not need the fastest Gen 4 card on the market — the Deck will not use those extra speeds. As of 13 November 2026, on Amazon UK they were:
| Drive | Form | Rough UK price |
|---|---|---|
| Crucial P310 1TB (CT1000P310SSD2) | Single-sided M.2 2230 NVMe | about £179 |
| WD_BLACK SN770M 1TB (WDS100T3X0G) | Single-sided M.2 2230 NVMe | about £236 |
Those prices move about, sometimes a lot. The P310 has been well under £100 in the past year, so it's worth shopping around and waiting for a dip if you're not in a rush. I would stick to a known brand with solid reviews if you can, and I would ignore no-name 2230 listings that look too cheap — unless, like me, you already have one that works.
Safety first
The battery is the one part that can really ruin your day if you get it wrong. A charged lithium-ion pack is a much bigger risk if you accidentally puncture it, so:
- Let the battery drop below about 25% before you open the Deck. Don't start this job at 80%.
- Put the Deck into battery storage mode in the BIOS (I'll show you how in Step 1). Valve recommends this before any internal work. In storage mode the power button will not turn it on, which is the point.
- Power it off, unplug every cable, and take out the microSD card if one is fitted. If you lever the back off with a card still in the slot, the card can snap in half.
- Disconnect the battery cable once the shield is out of the way, and do that before you touch the SSD. Pull the plug towards the battery, not straight up.
- Work on a clean, dry table. Touch a bare metal radiator or the metal chassis first so you're not carrying a static charge, and handle the new SSD by its edges.
Before you open it
Back up anything you care about. Re-imaging the new SSD wipes it clean. Steam Cloud will have saves for a lot of games, but not all of them, and it will not have your screenshots, non-Steam games or any extras you've installed. Copy those off to a USB stick or cloud storage first.
Make the recovery USB before you start, or at least start the download. It's a few gigabytes, and you'll want the stick ready as soon as the new drive is in. The full steps are in Step 9, so you can do that now and skip back to them later.
Keep the original 64GB module. Put it in a labelled bag. If you ever need to send the Deck away, it's much simpler if you can put it back how it was.
STEP 1Discharge the battery and enter storage mode
- Use the Deck as normal until the battery is below 25%.
- Shut it down from the Power menu (not just Sleep).
- Hold Volume Up, then press the Power button. Release both when you hear the startup chime. You should land in the BIOS.
- Using the D-pad and the A button, go to Setup Utility, then Power, then Battery storage mode. Confirm Yes.
- The Deck will power off. On an LCD model the power LED blinks three times to confirm it's in storage mode. (On an OLED it blinks blue twice.)
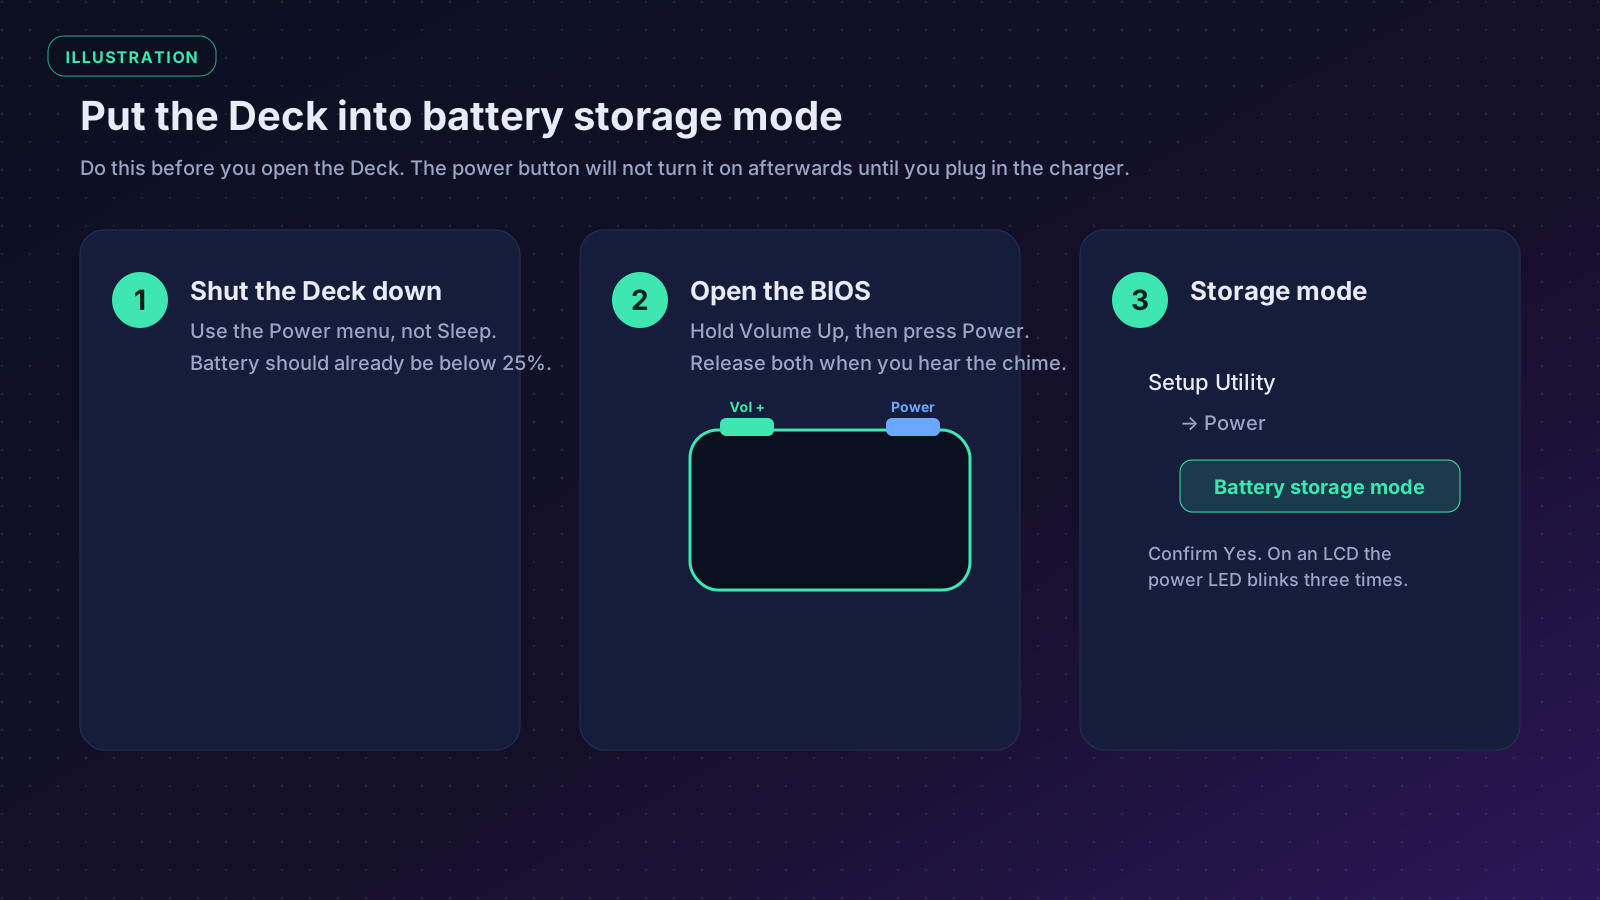
Now unplug every cable, and slide out the microSD card if you use one.
STEP 2Remove the back cover screws
Lay the Deck face-down. If you've still got the official case, sit it in there so the thumbsticks are protected.
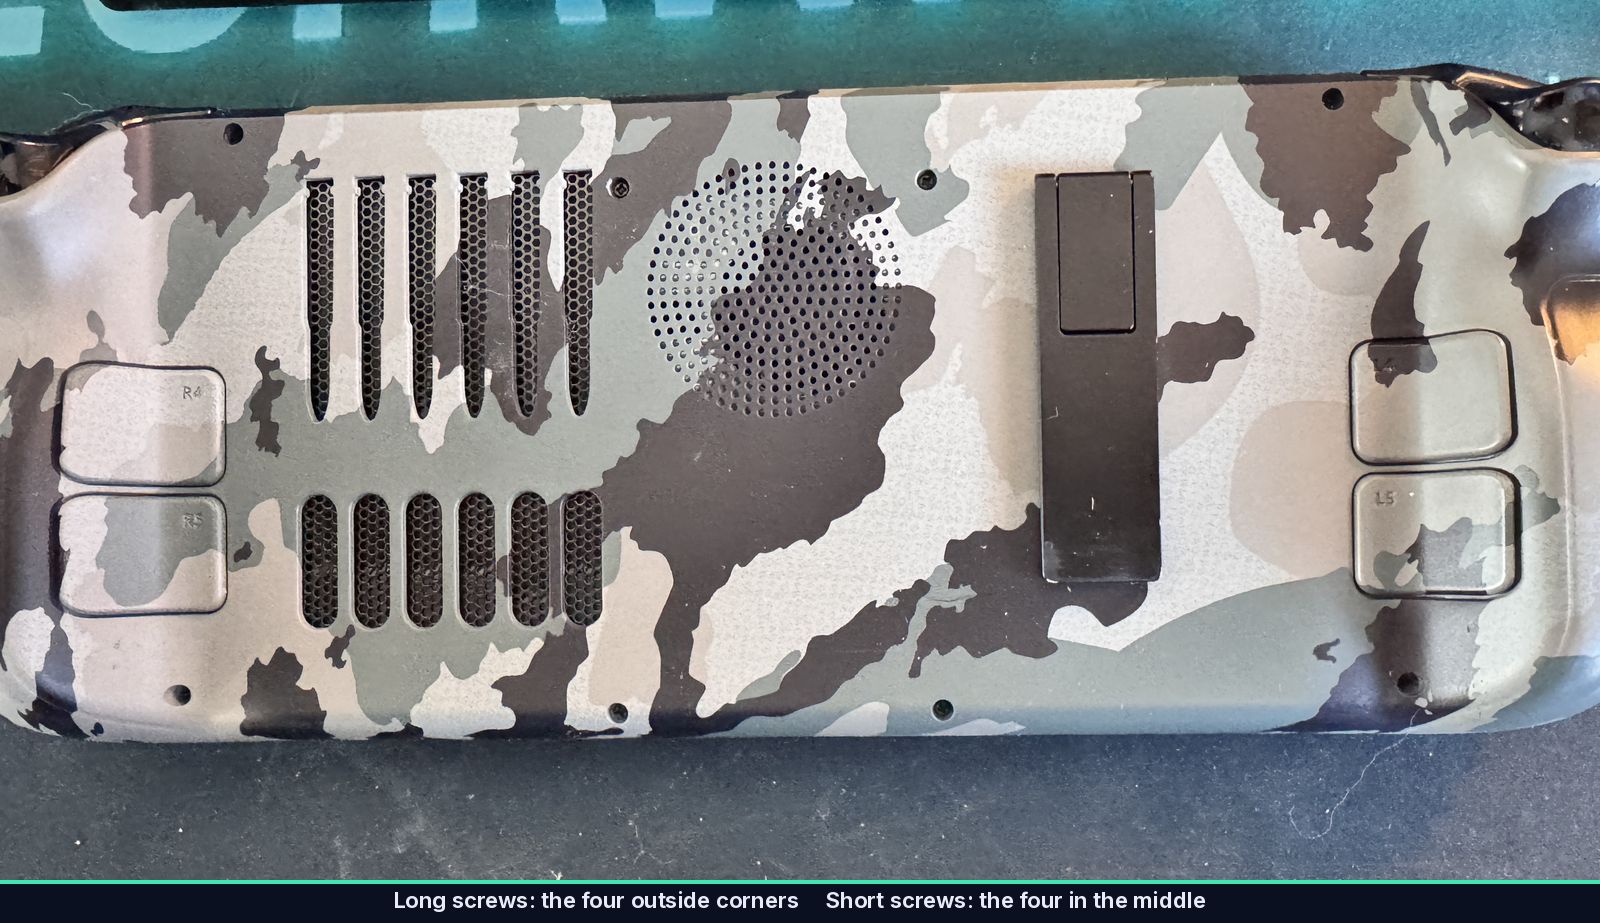
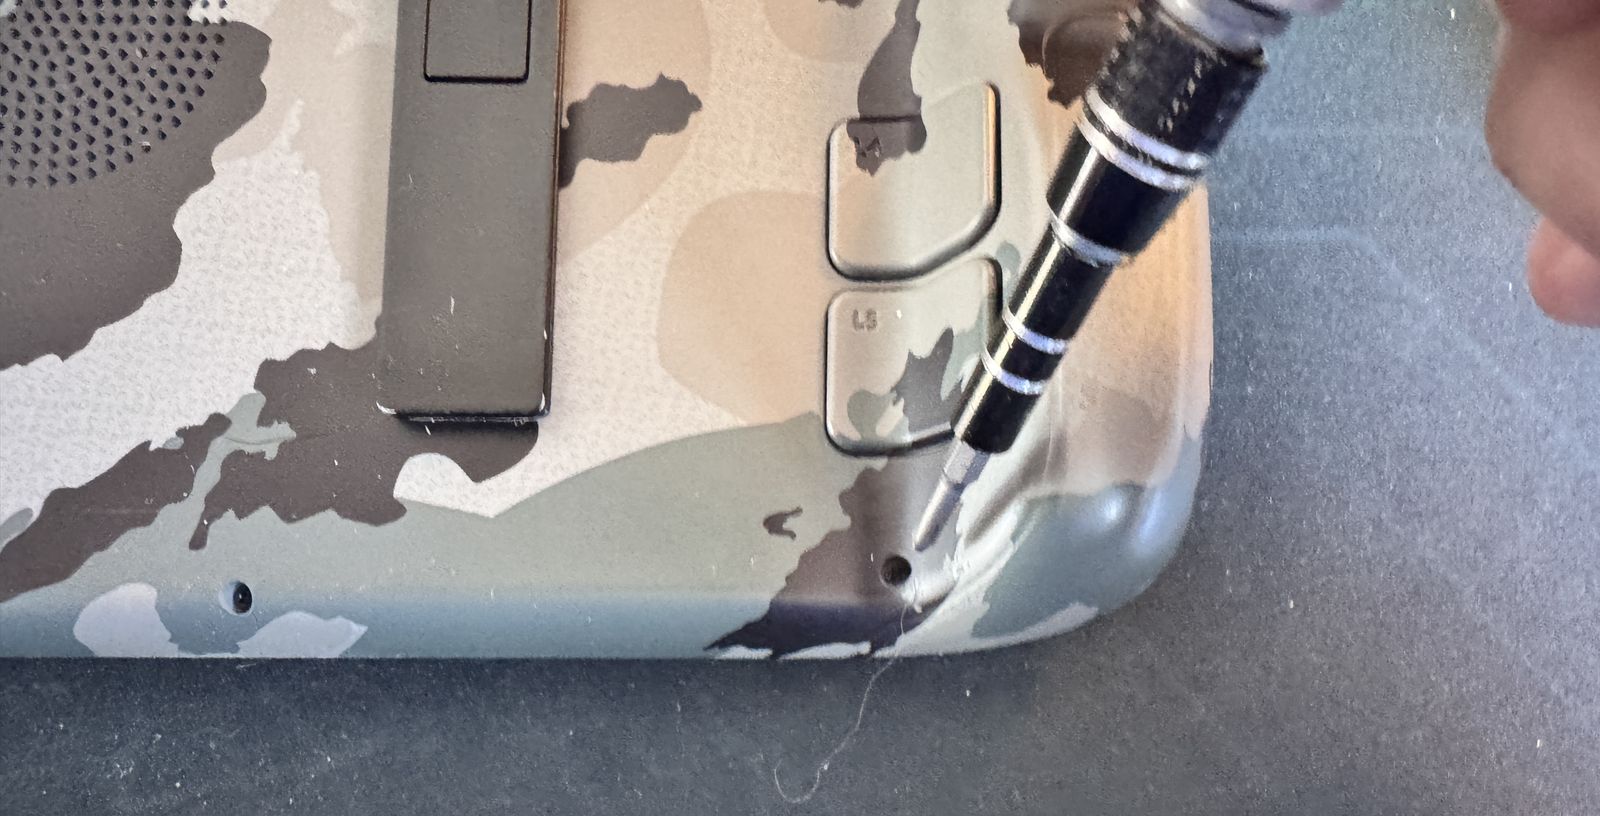
There are eight Phillips screws in the back:
- Four longer ones, about 9.5 mm, with a coarse thread. These go in the four outside corners.
- Four shorter ones, about 5.8 mm, with a fine thread. These go in the middle, along the top and bottom edges.
They must go back in the same holes. I lined them up on a sheet of paper in the same pattern as the Deck, but a pill organiser or an ice-cube tray works too. Don't mix them up, and don't over-tighten them later or you can strip the plastic threads.
STEP 3Pry off the back shell
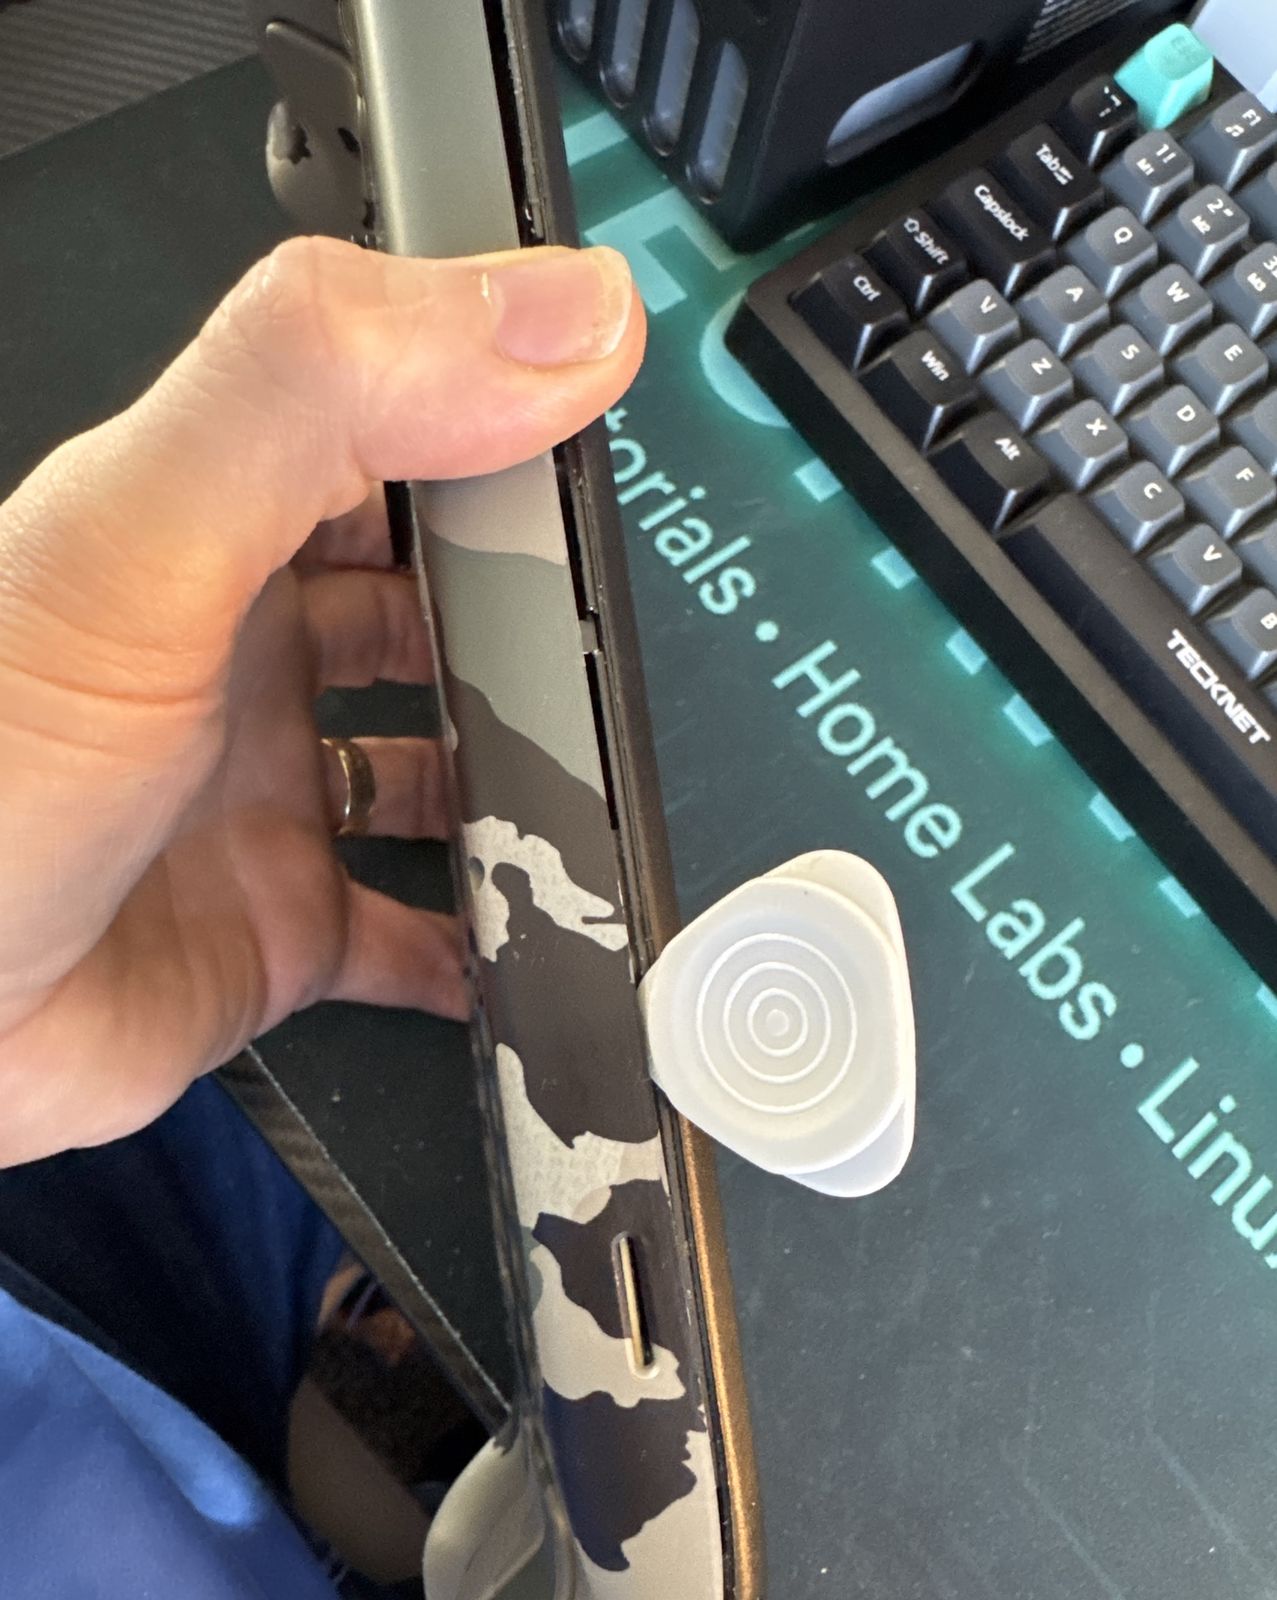
The back is held on by plastic clips as well as the screws.
- Start at the thin gap along the right grip (the right-hand handle as you look at the back). Slide a guitar pick or plastic pry tool into the seam.
- If it will not go in at the grip, start on the top or bottom long edge and work towards the handle.
- Pry gently to pop the clips. Once one edge is free, the rest usually come quite easily.
- Lift the cover up and away, and set it aside.
Take your time. The clips can mark or snap if you rush or use a metal tool.
STEP 4Remove the board shield
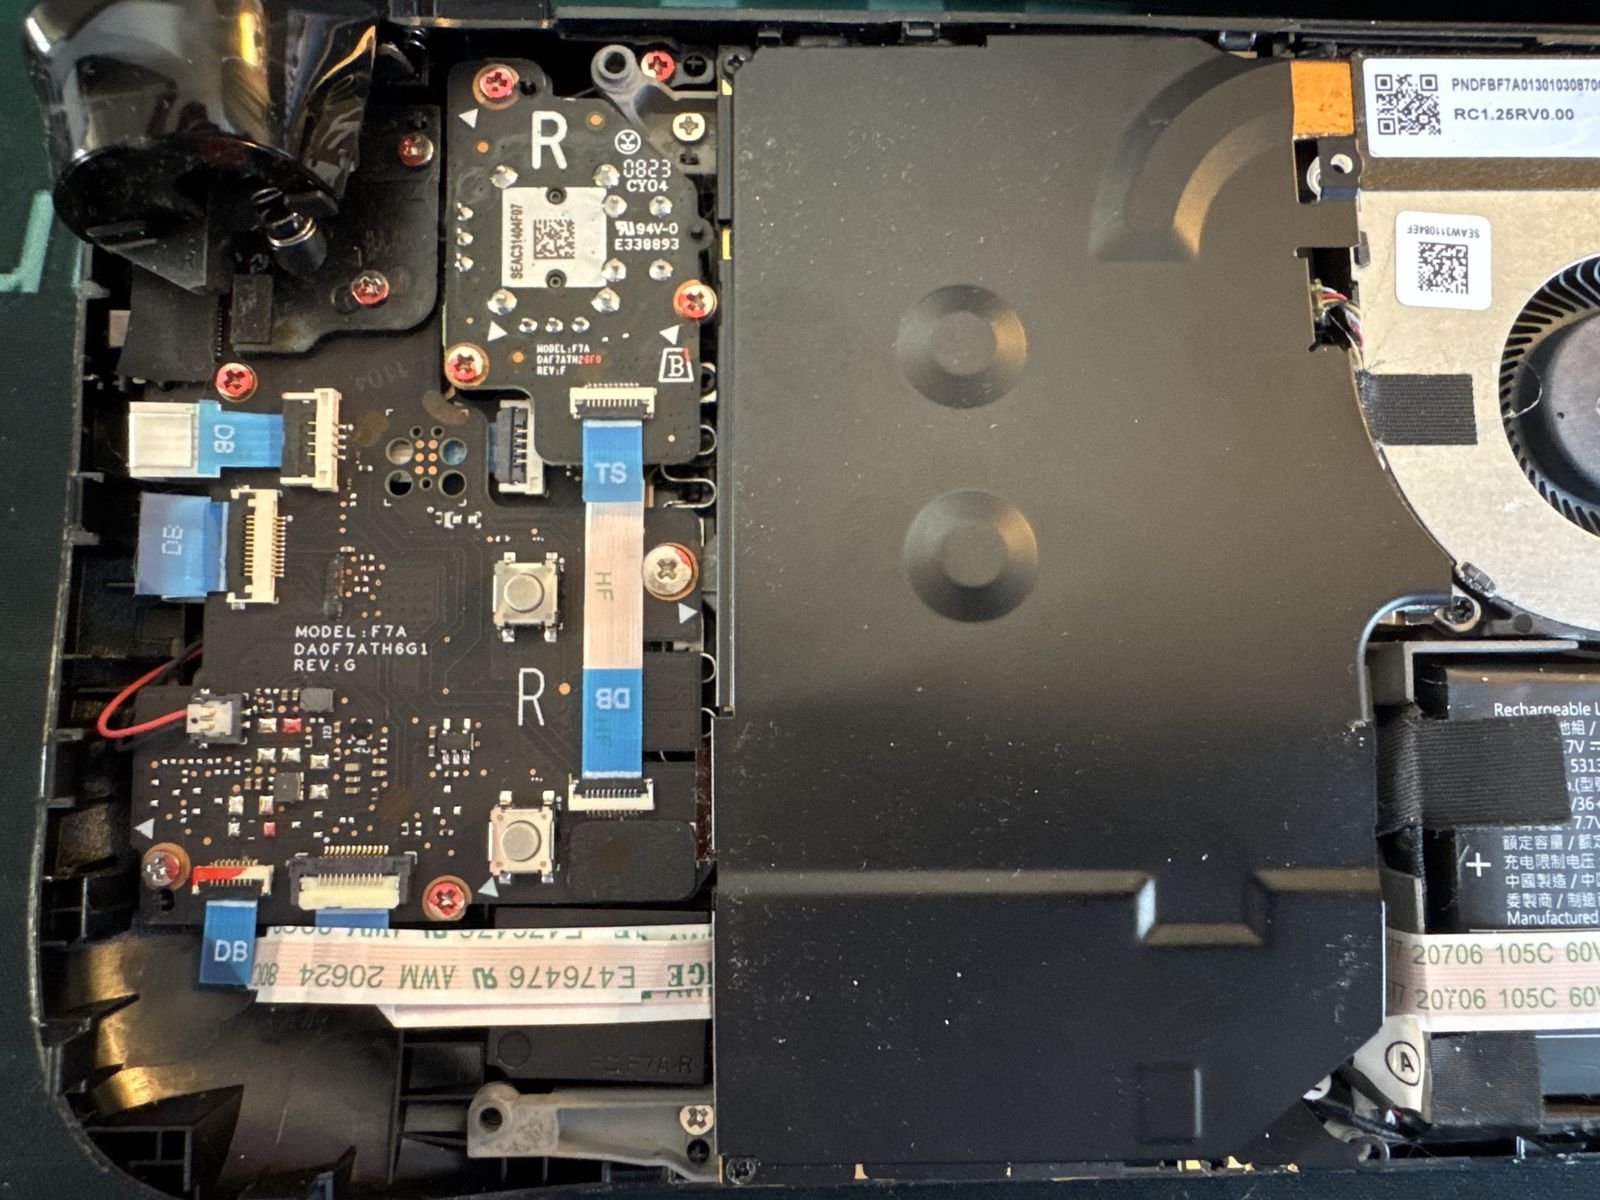
Under the back you'll see a metal or black shield over the motherboard. Mine is the black one.
If the shield is black (the early-2023 refreshed LCD, like mine):
- There is no foil tape and no hidden screw.
- Undo the two Phillips screws along the left edge of the shield.
If the shield is metallic (the original 2022 design, with a fan that has square sides):
- Look for a small piece of foil tape covering a hidden screw on the shield. Peel it off carefully with tweezers so you can reuse it.
- Undo the three Phillips screws holding the shield: one shorter hidden screw and two slightly longer ones along the left edge.
Lift the shield off. It may tug a little if it's stuck to the thermal pads underneath. That's normal. Remember for later: the fan cable should sit beside the shield, not pinched underneath it.
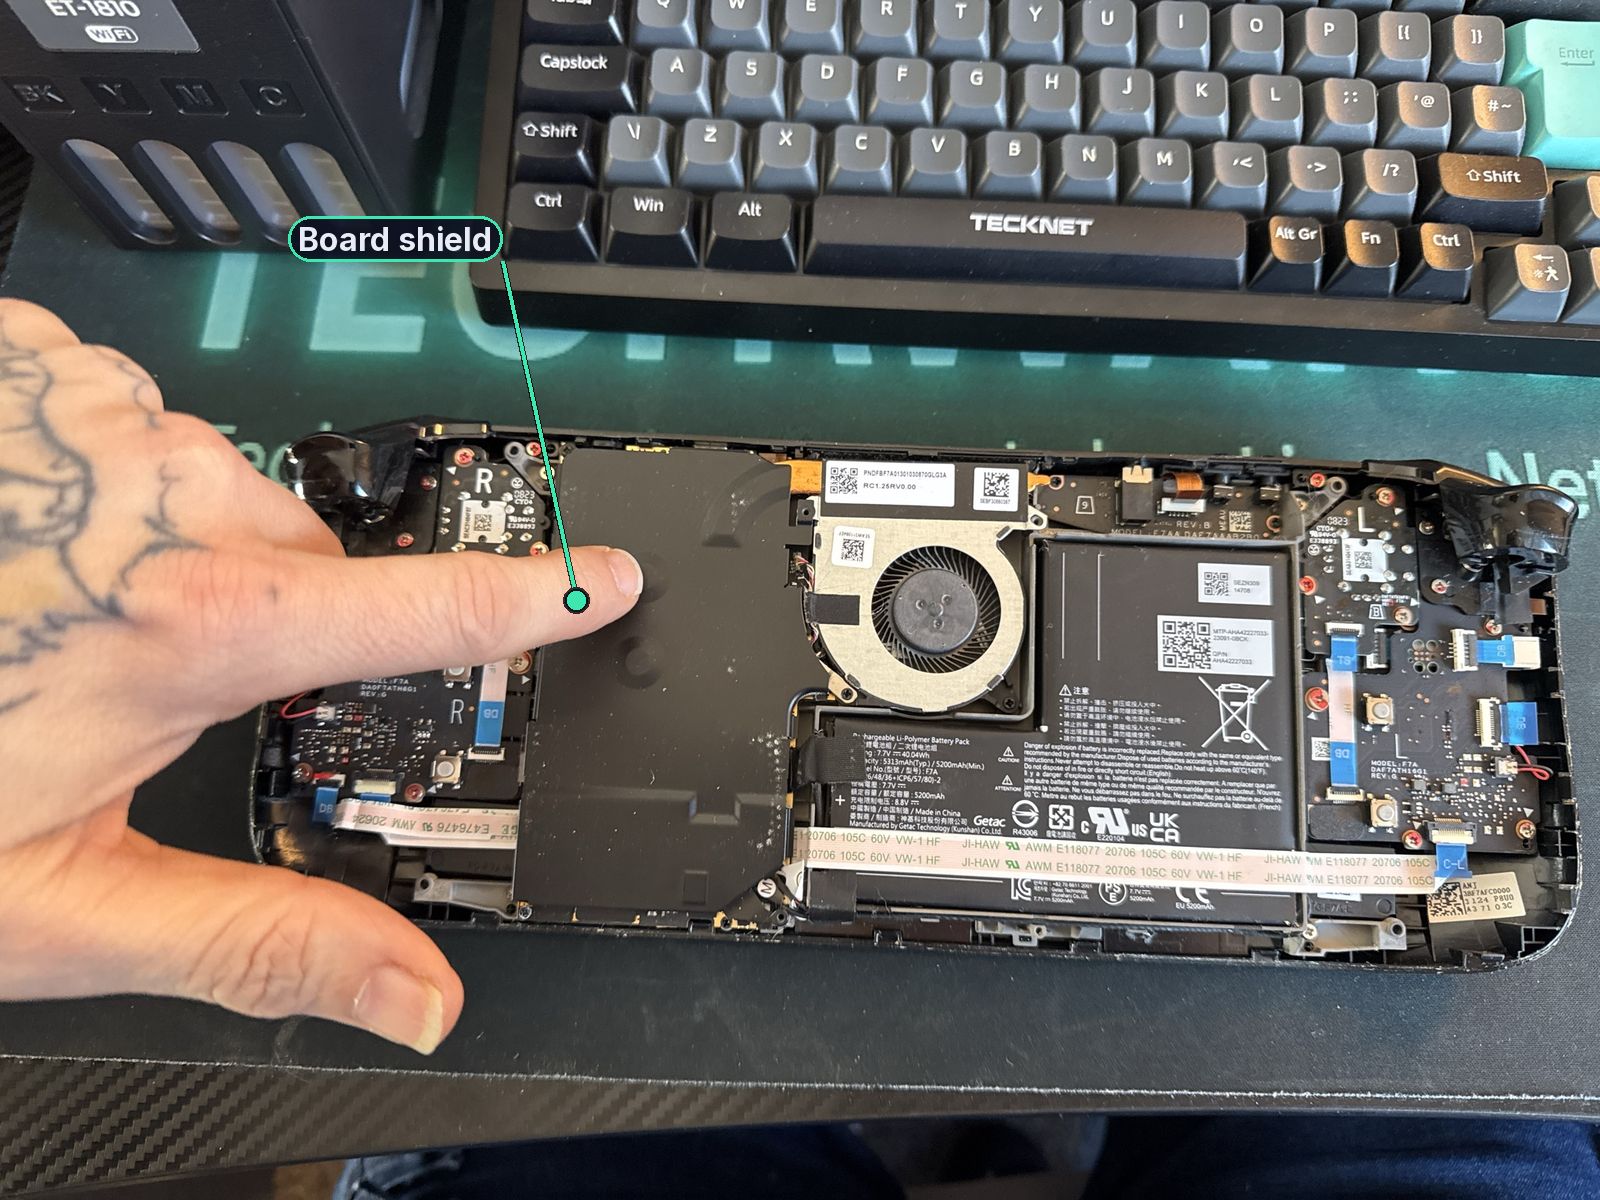
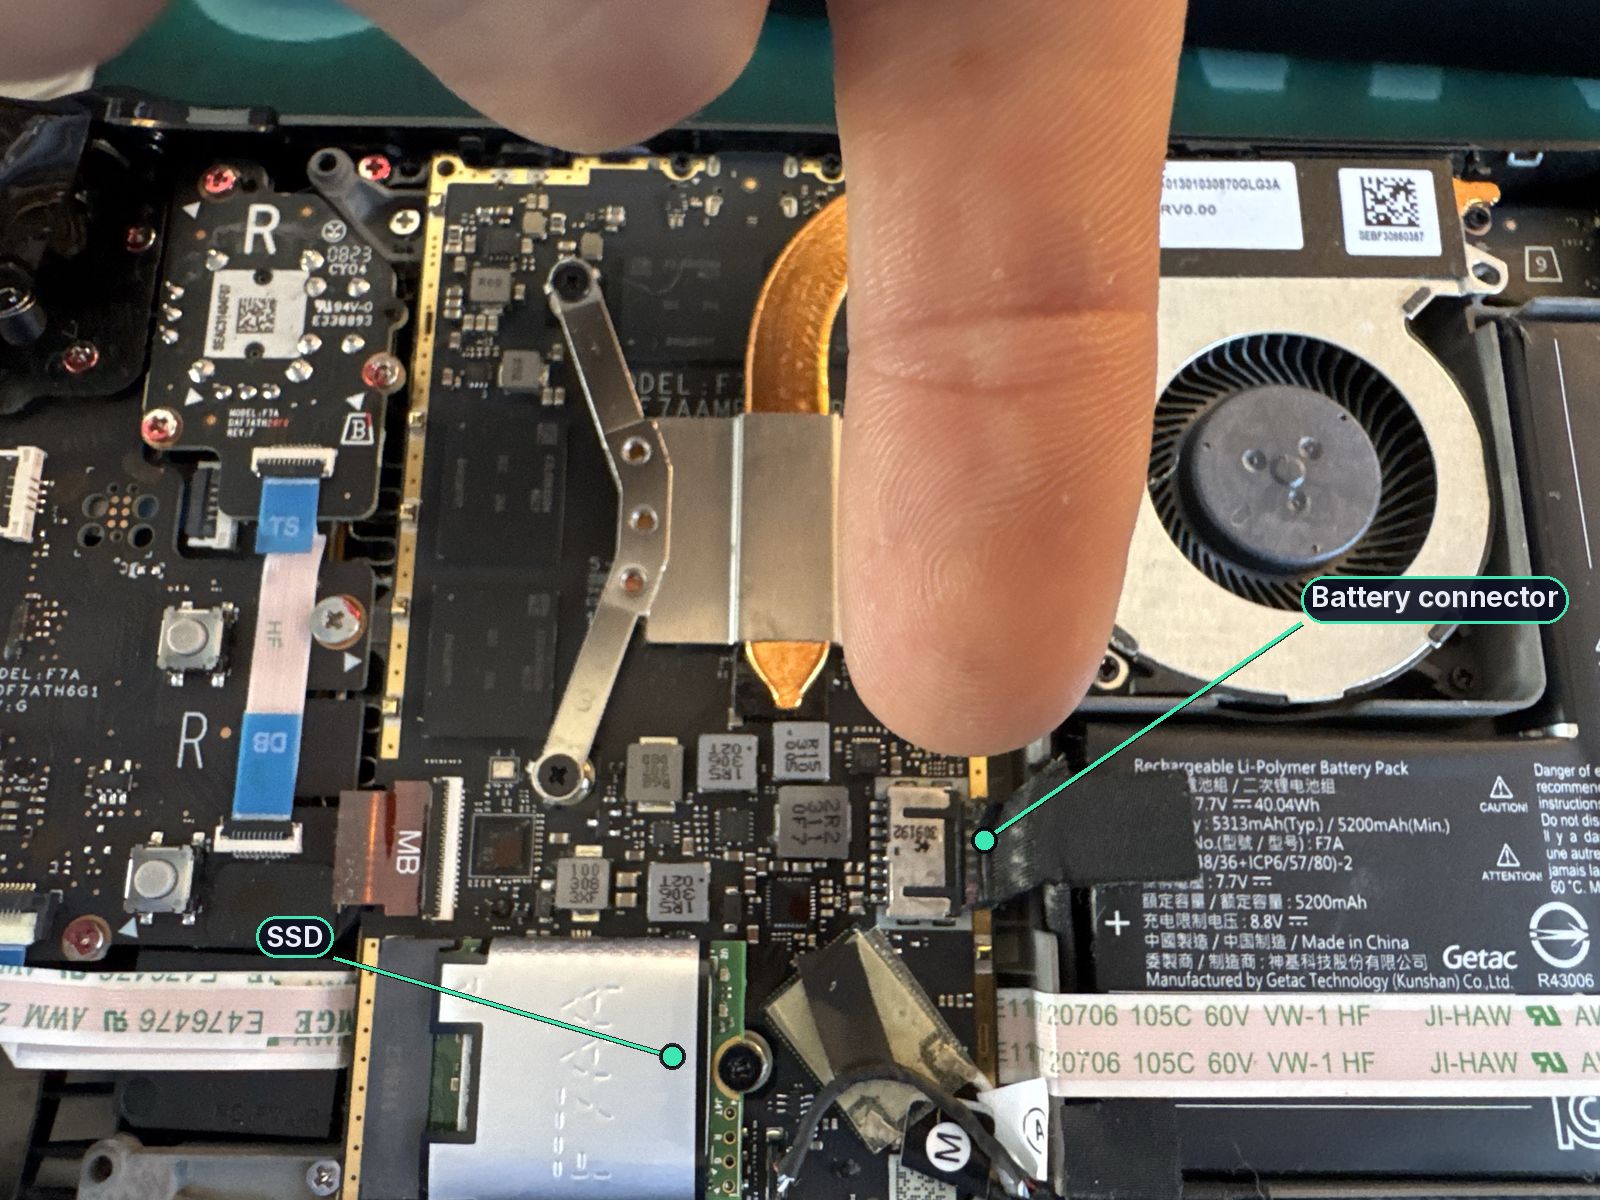
With the shield off, it's worth getting your bearings before you pull any plugs.
STEP 5Disconnect the battery
This is the step you must not skip.
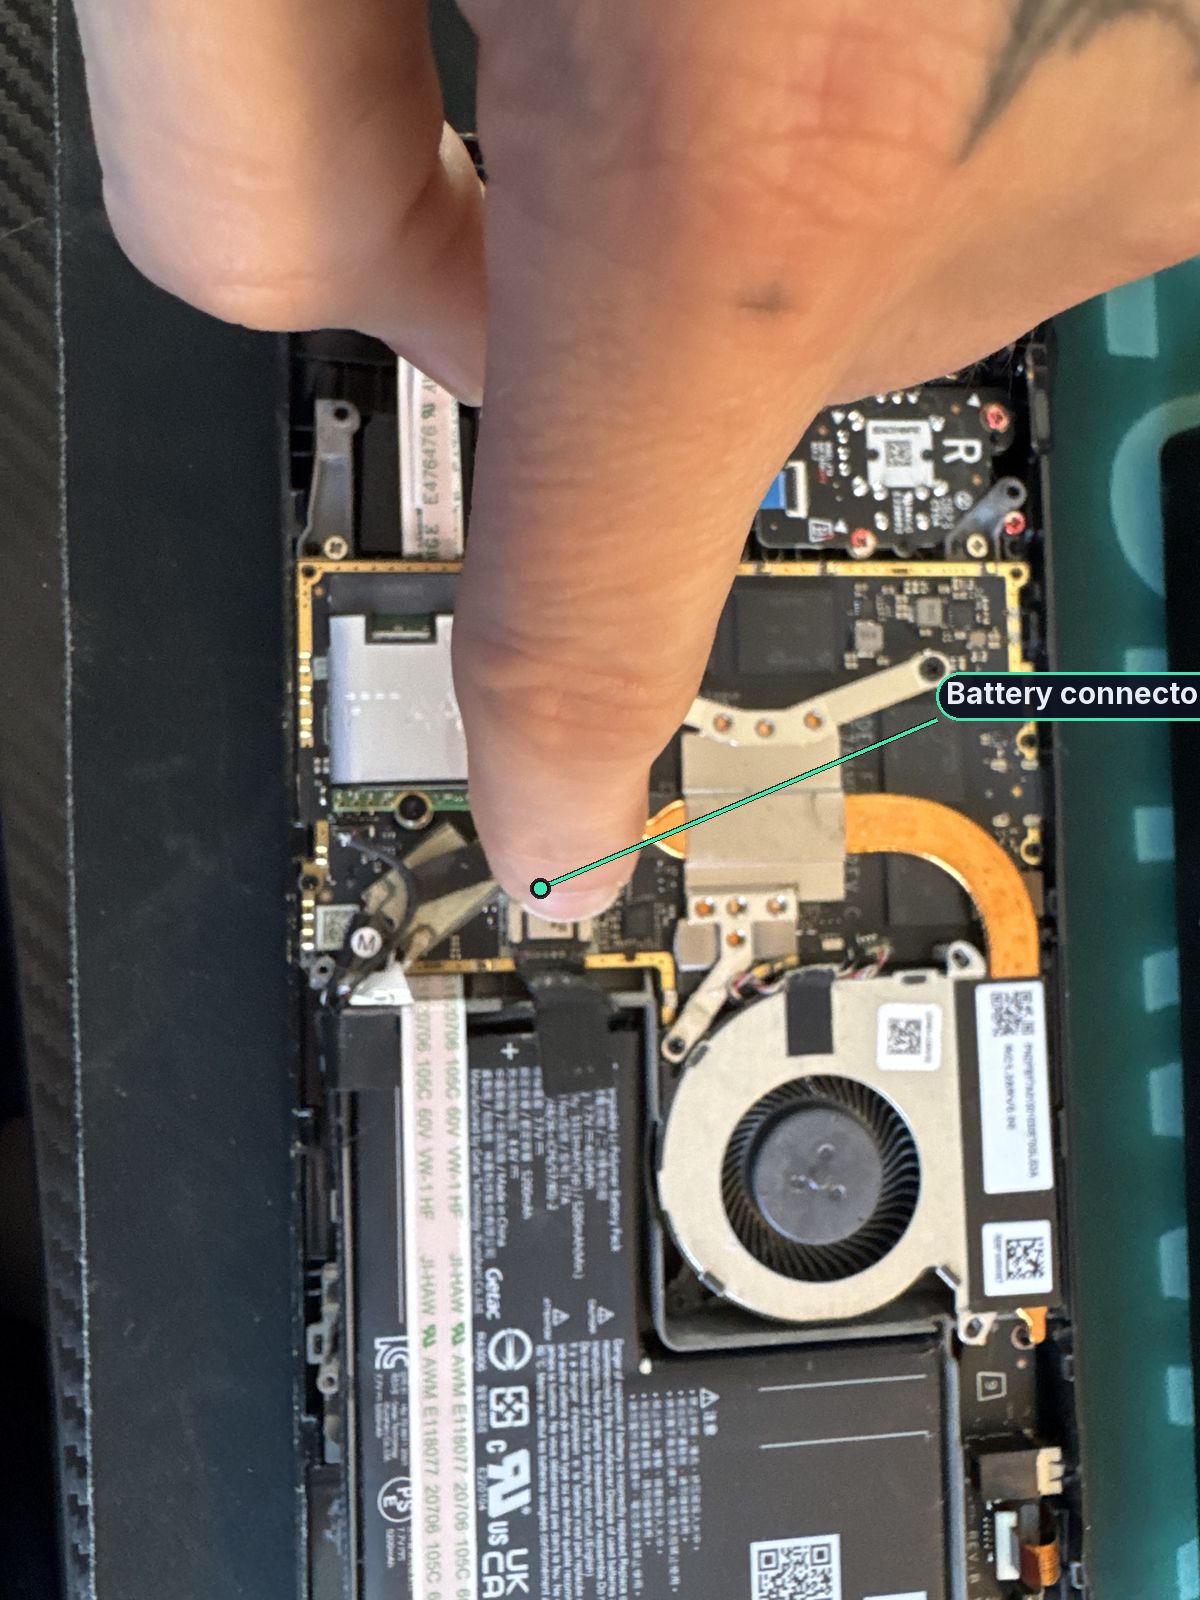
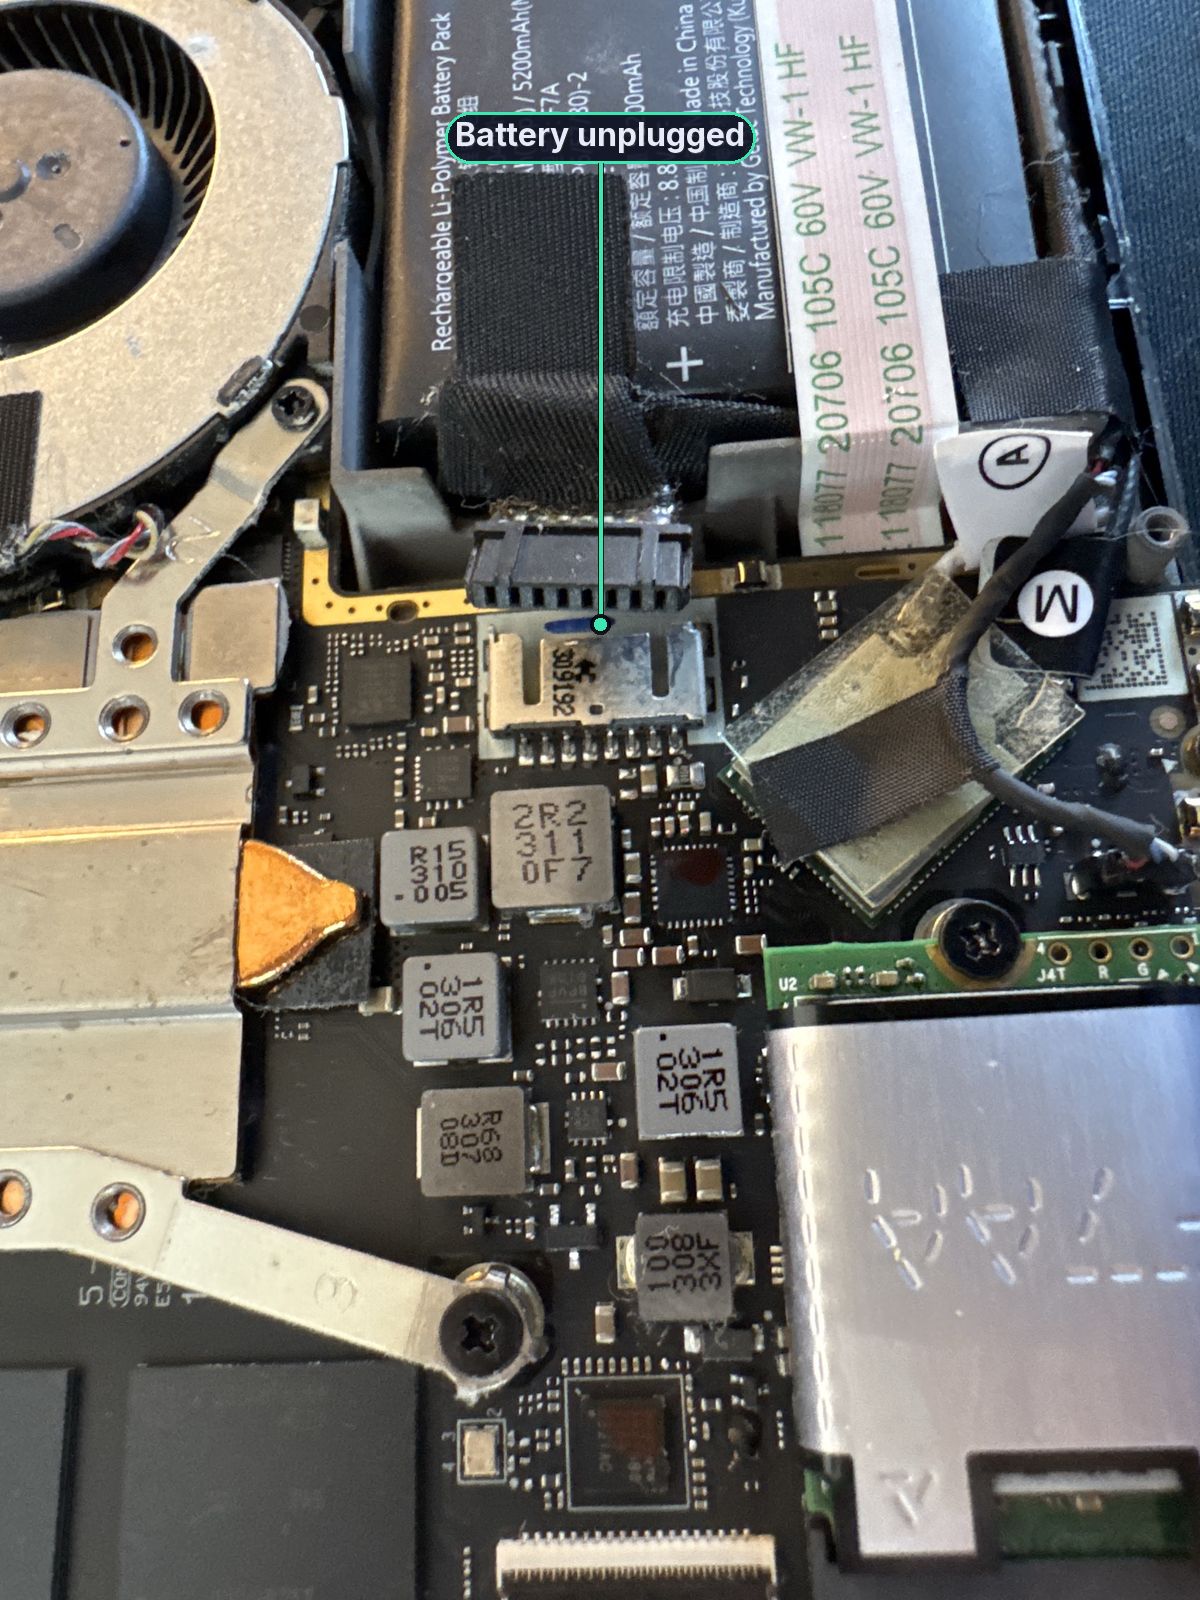
The battery cable is a small plug on the edge of the motherboard, with a fabric pull tab. Grip the tab and pull the connector straight towards the battery, away from the board. Don't yank it upwards.
If the tab is awkward, you can ease the plug out with a fingernail or the flat end of a plastic tool, then finish it by hand. Once it's unplugged, nothing inside is live, and it's safe to swap the drive.
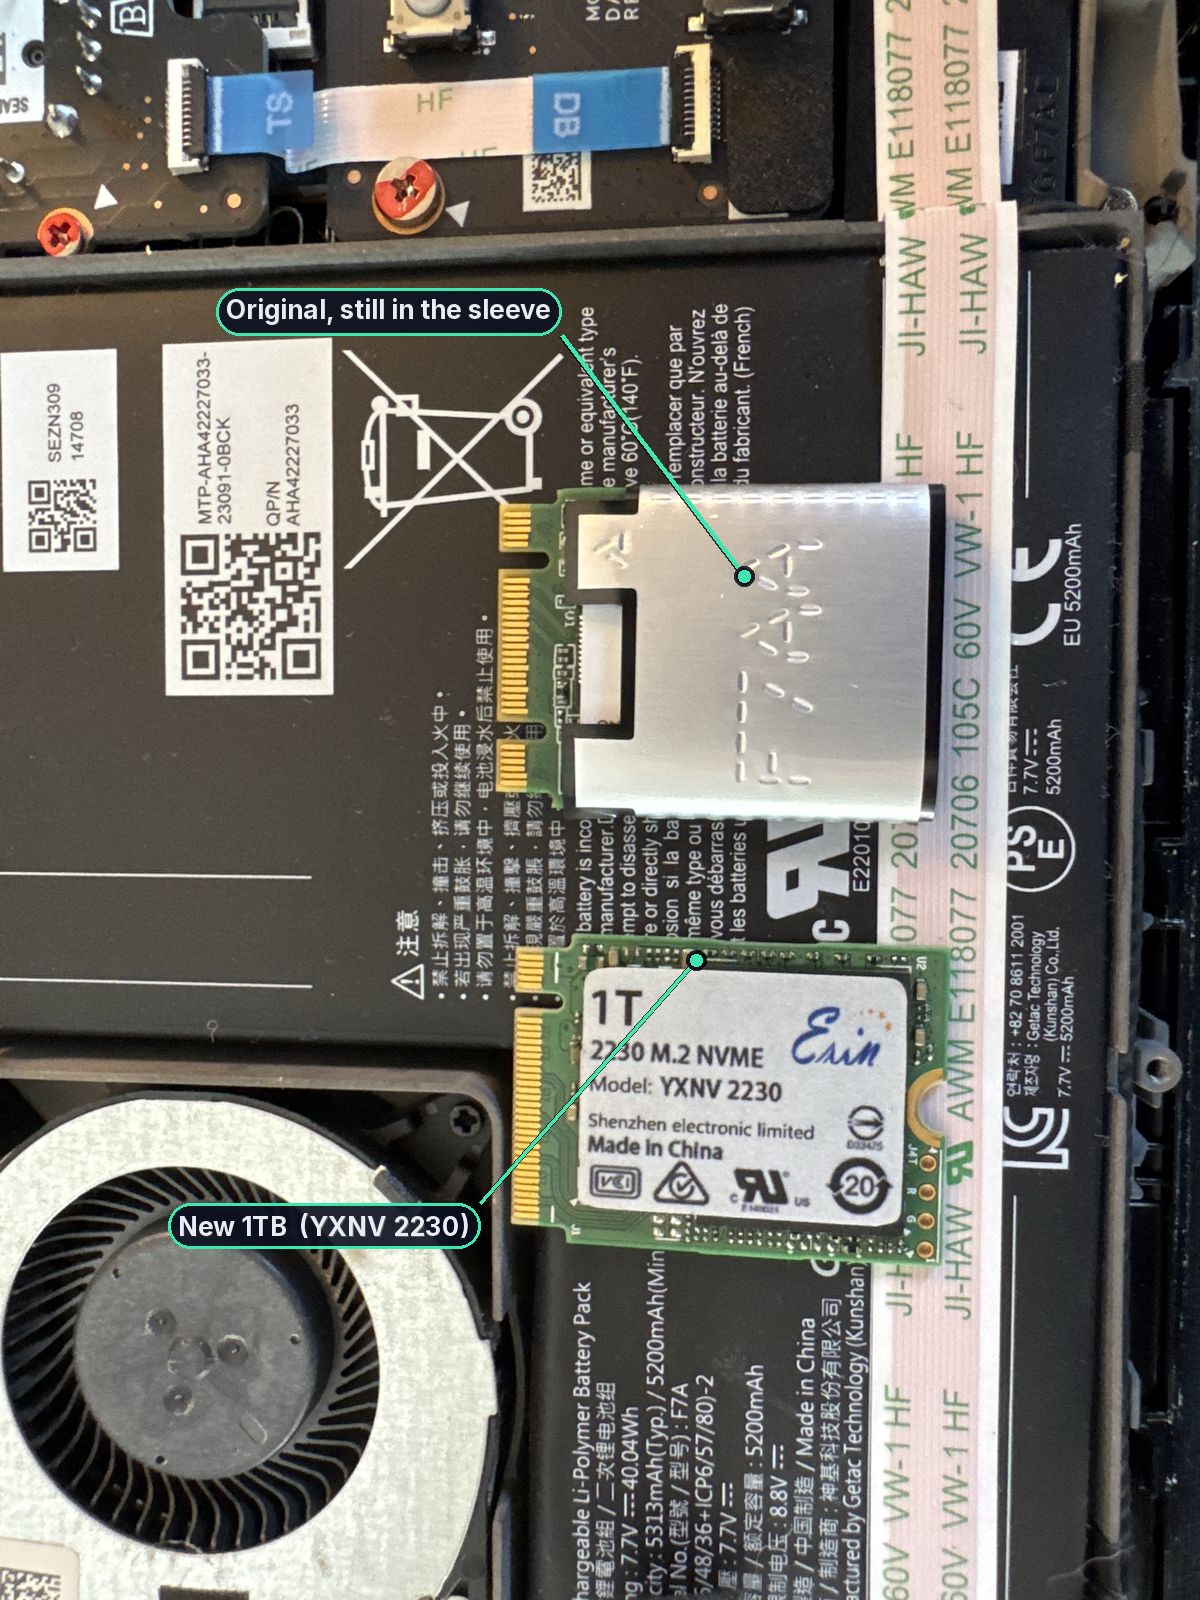
STEP 6Swap the SSD and the anti-static sleeve
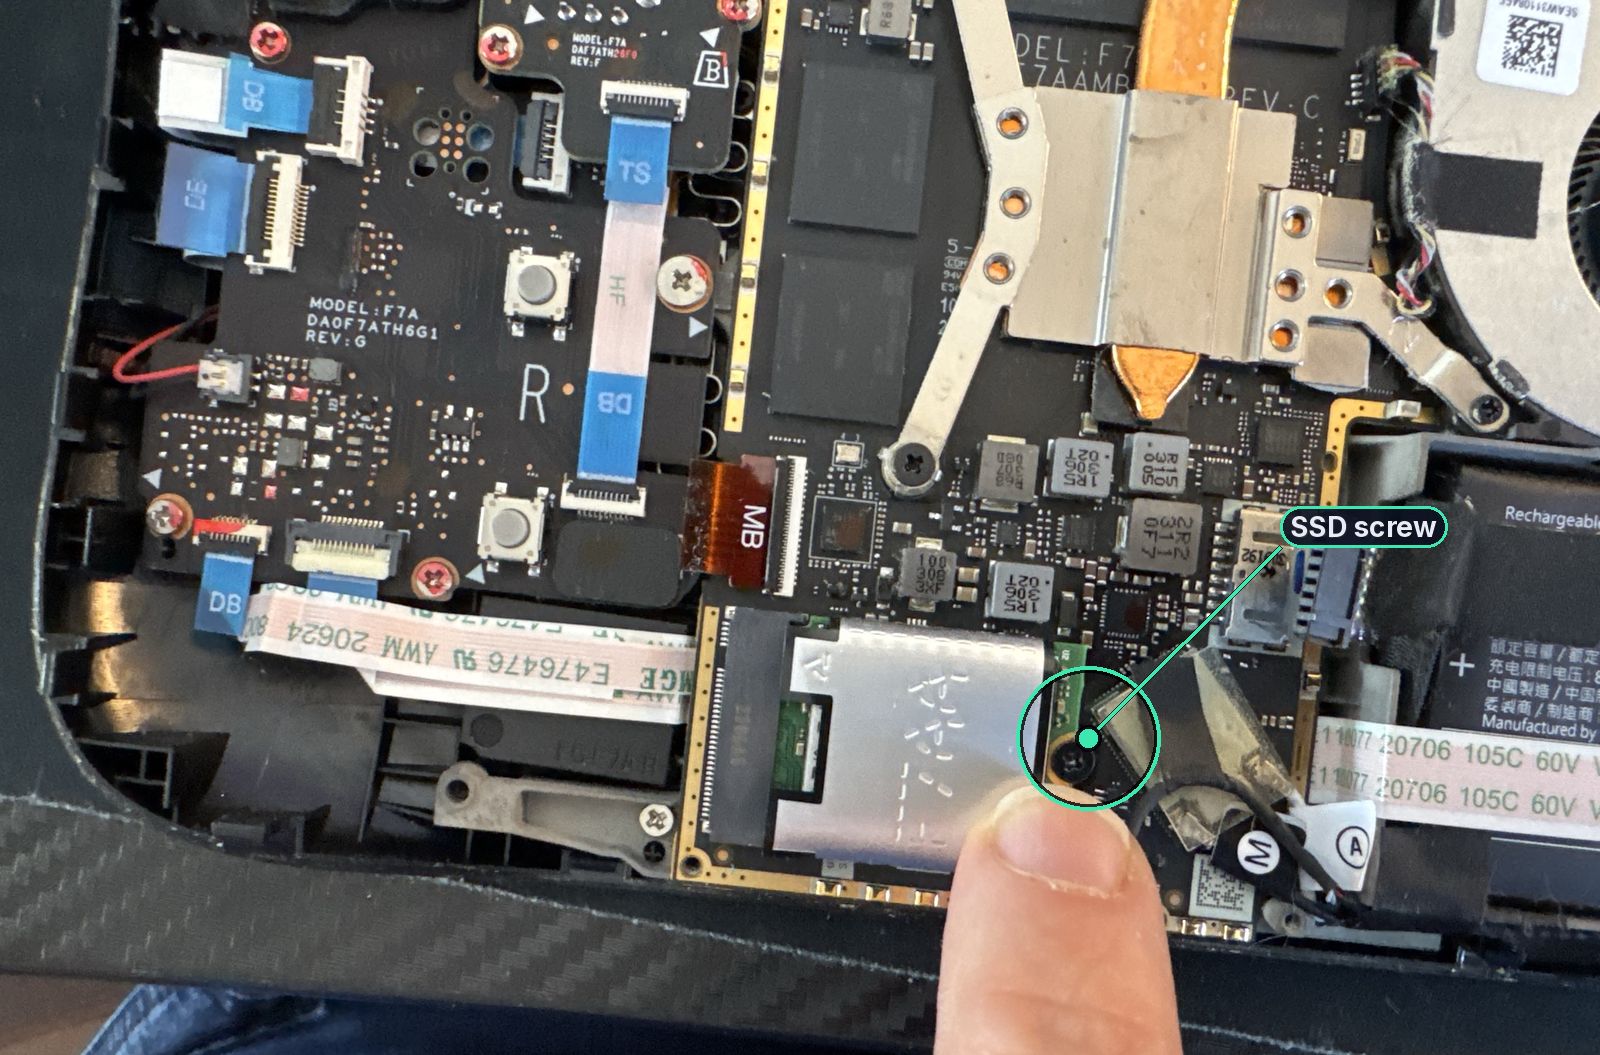
- Undo the single Phillips screw that holds the drive down. On an LCD this is a small screw, about 3.4 mm.
- The module will pop up to a shallow angle. Slide it out of the M.2 slot. Don't force it.
- The drive is wrapped in a thin foil anti-static sleeve (it's also an ESD and heat shield). Slide that sleeve off the old module and straight onto the new SSD. If it's stuck, ease it with tweezers, but keep it in one piece. The new drive needs this wrap.
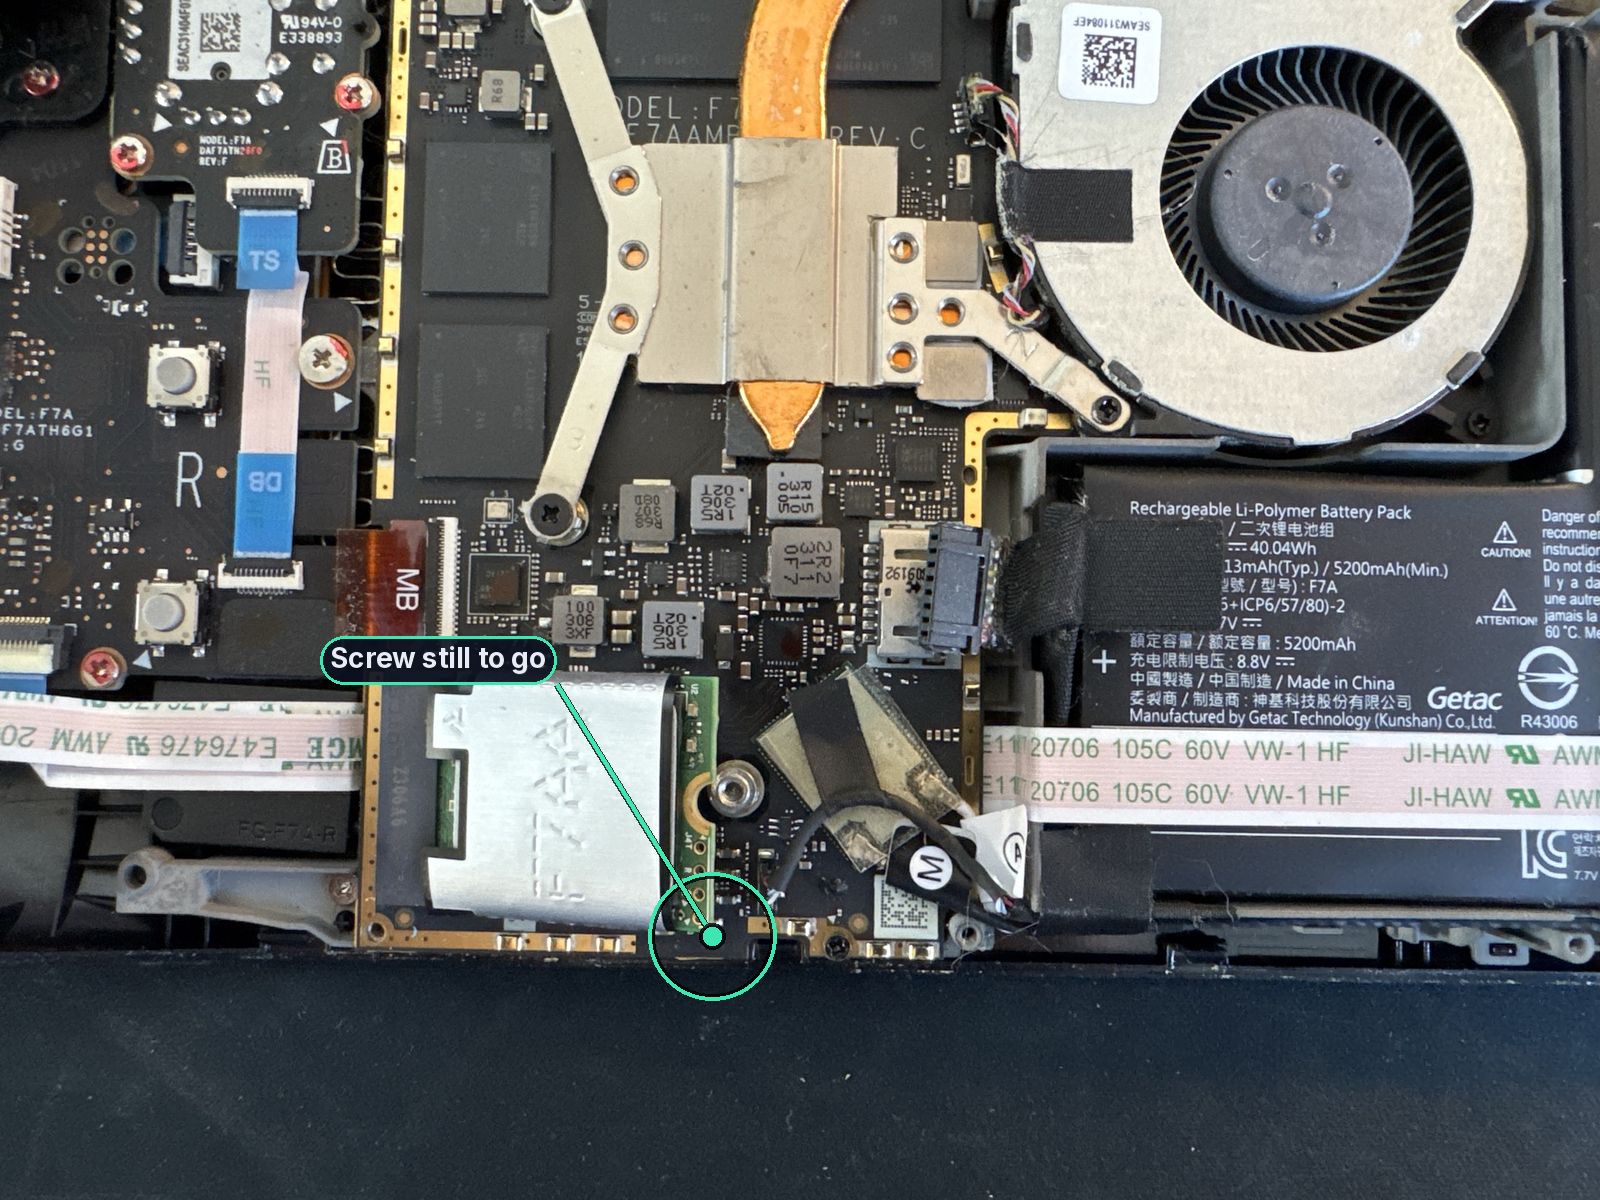
- Hold the new SSD by the edges and slide it into the slot at a shallow angle, about 30 degrees. Don't force the connector.
- Lower it onto the screw post and put the screw back in, snug but not cranked down.
STEP 7Reassemble
Work backwards:
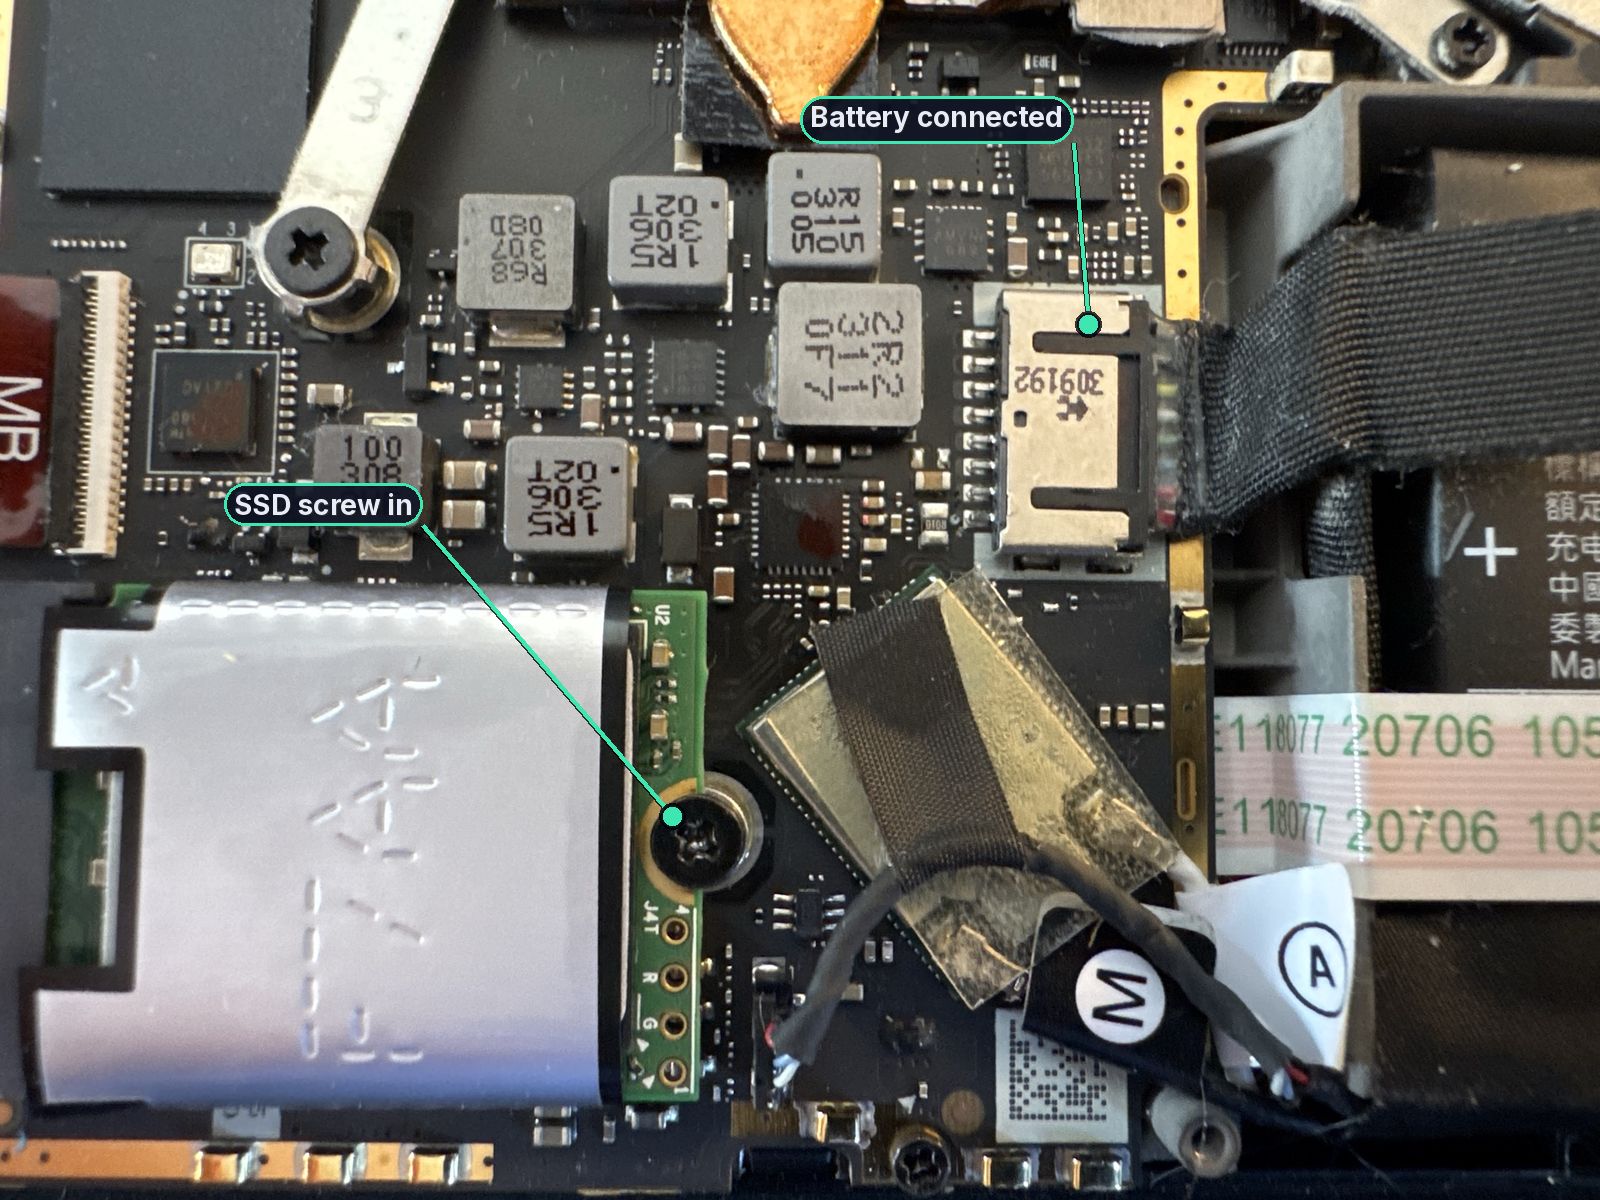
- Make sure the SSD screw is in, then plug the battery cable back in, straight into its socket, until it sits fully home.
- Put the board shield back on. Make sure the fan cable is beside it, not trapped under it. Refit its two screws (or three, if you have the earlier metal shield, and stick the foil tape back over the hidden one).
- Leave the original back off if you're fitting the camo shell next. If you're reusing the original back, line it up, press the clips home all the way round, and put the eight screws back in their original holes: long ones in the four outside corners, short ones in the middle.
STEP 8Fit the camo back
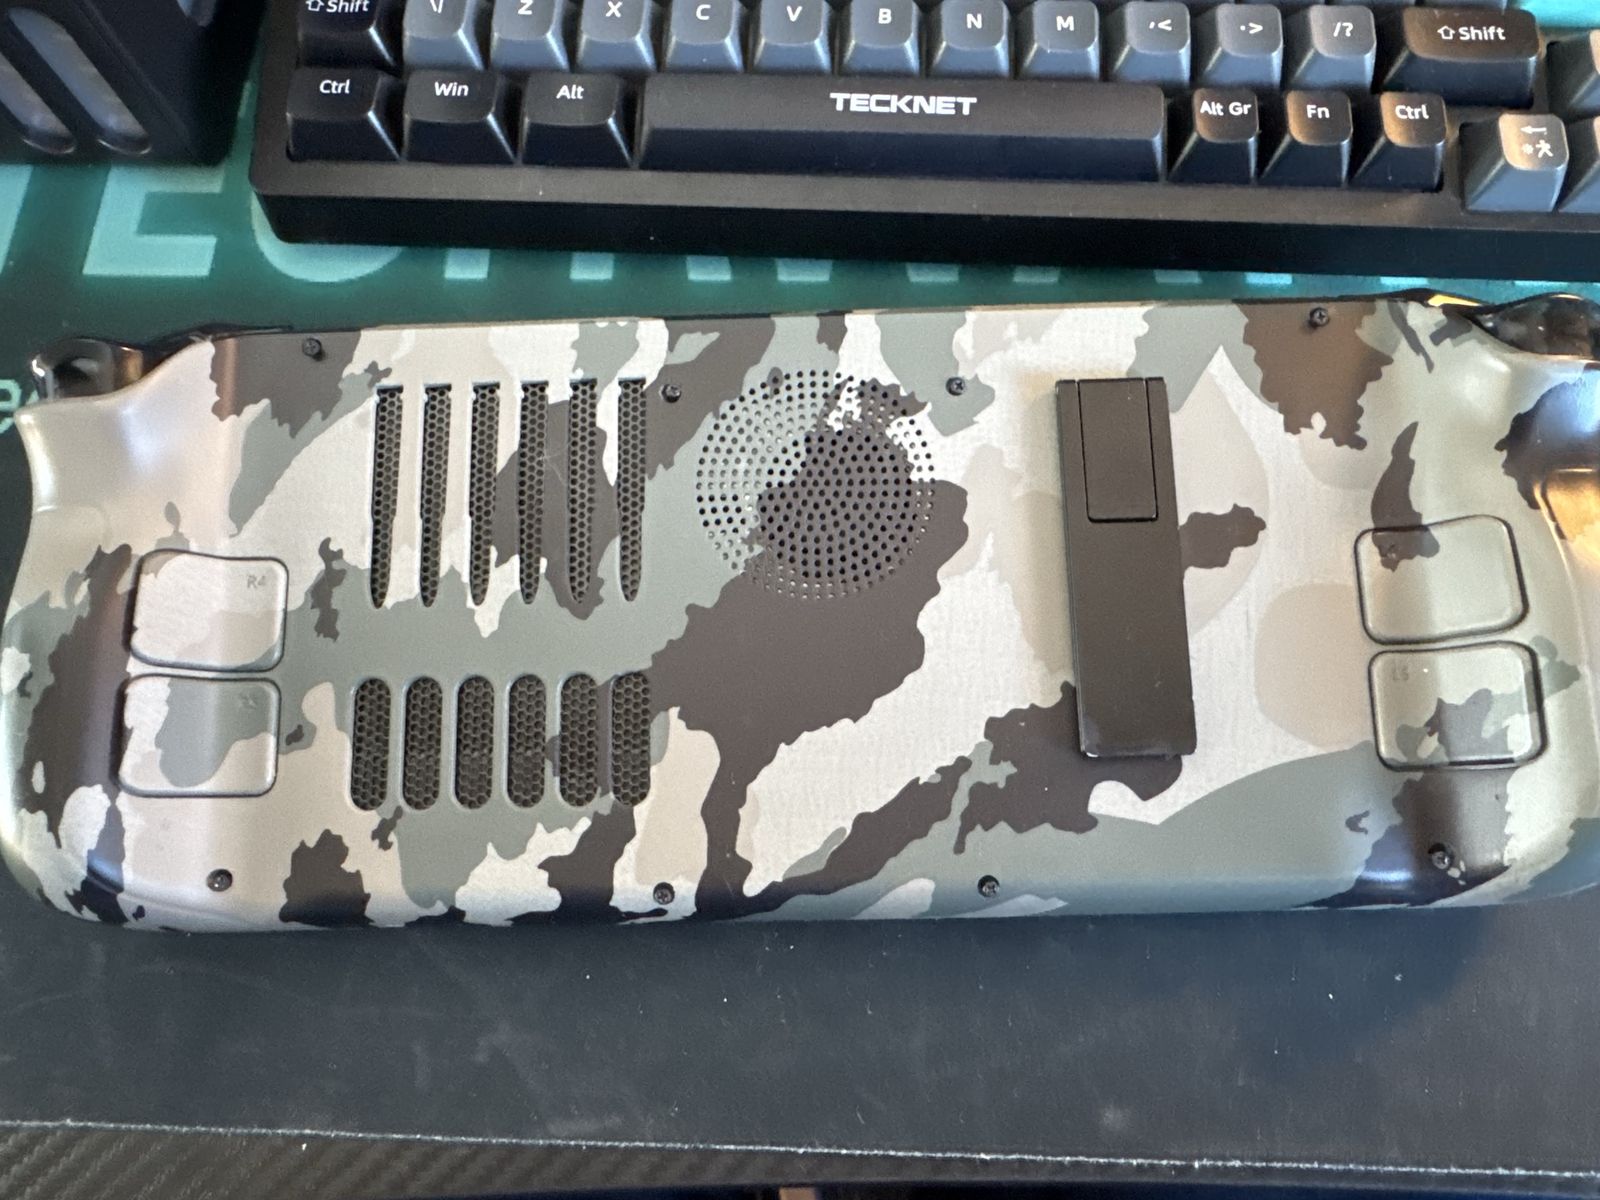
I fitted a custom camo back shell while I had the Deck open. An aftermarket back usually uses the same eight screws and the same clip points as the original shell. Line it up, press the clips in around the grips and the long edges, then fit the screws back into the same holes as before: long coarse screws in the four outside corners, short fine screws in the middle.
Don't pinch any cables, and don't over-tighten. If a clip feels stubborn, take the shell off and try again rather than forcing it.
STEP 9Make the SteamOS recovery USB
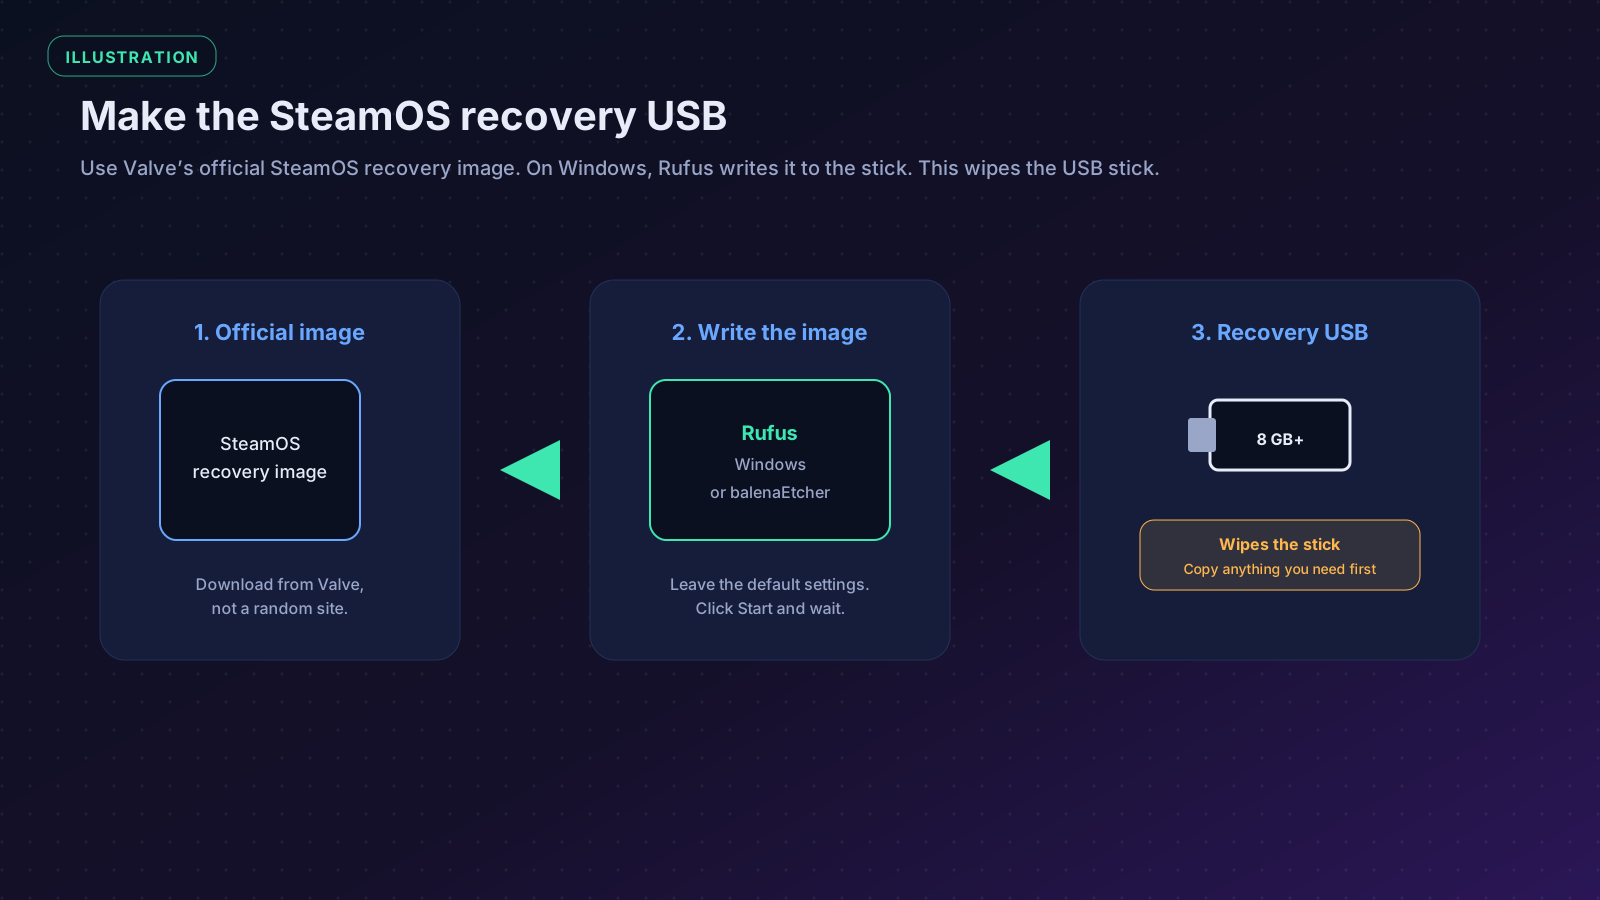
The new drive is empty, so it needs a fresh copy of SteamOS. Use Valve's official recovery image, not a random download. The instructions live on Valve's SteamOS recovery and troubleshooting page, and you can get the image from the SteamOS download page for Steam Deck.
On a Windows PC, I used Rufus (free, from rufus.ie):
- Download the official Steam Deck recovery image. It's a large file, so give it a few minutes.
- Plug in an 8 GB or larger USB stick. Everything on that stick will be wiped.
- Open Rufus, choose the USB stick as the device, then select the recovery image you just downloaded.
- Leave the default settings as they are and click Start. Confirm that you're happy to erase the stick, then wait until it finishes.
If you're on Linux or a Mac, balenaEtcher does the same job. It can write the compressed image directly.
STEP 10Boot from the USB
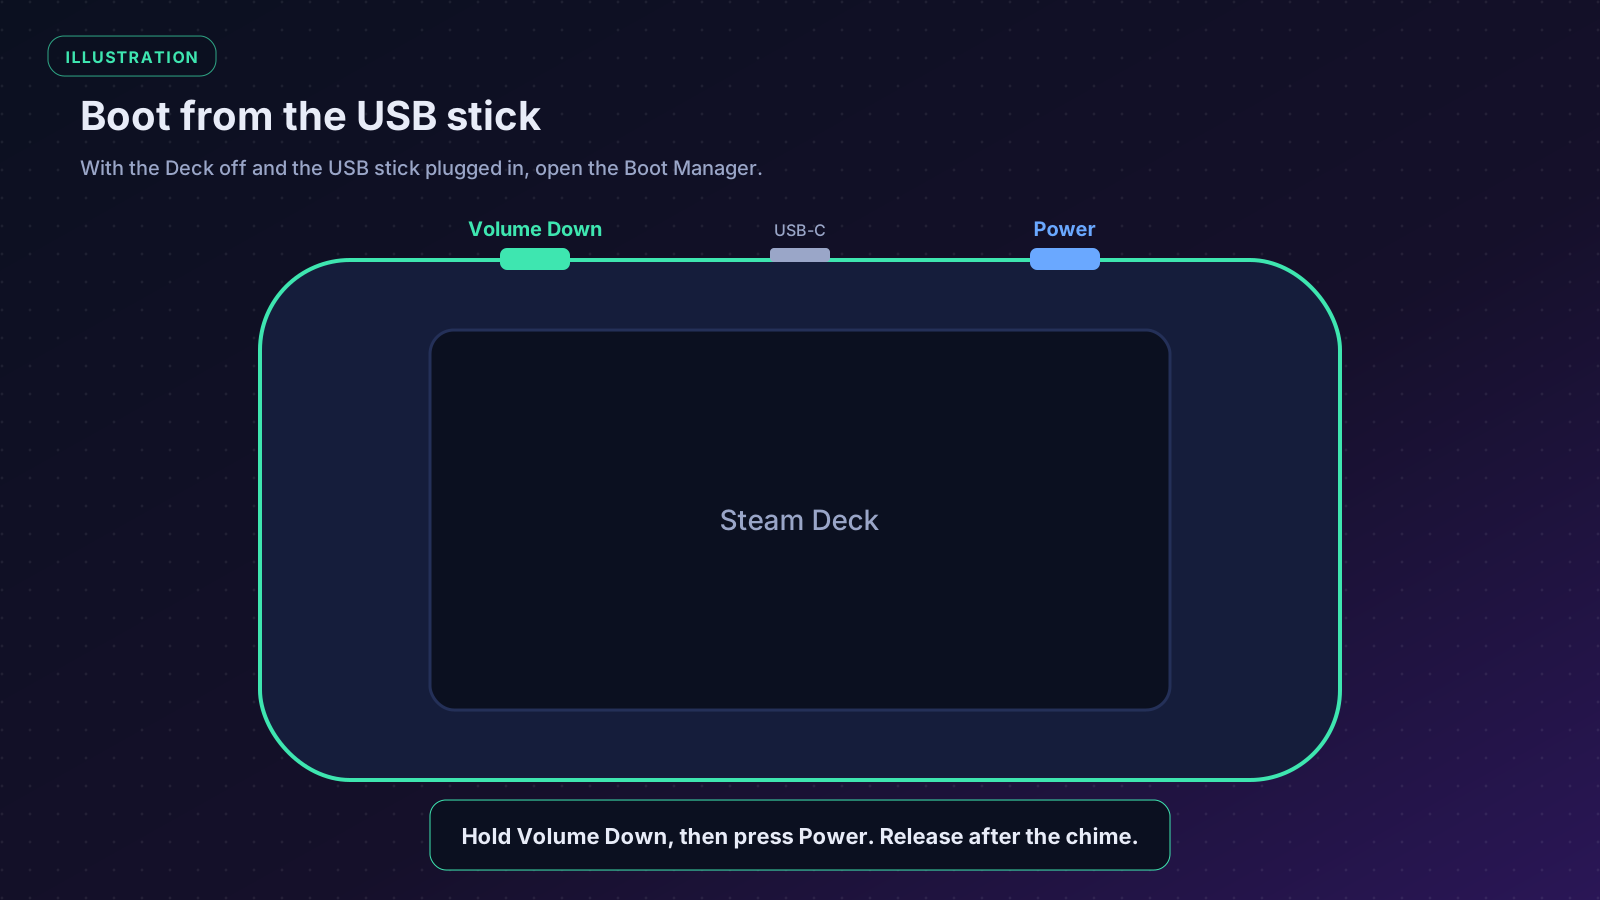
- Plug the USB stick into the Deck. Use a USB-C stick, or a USB-C hub if your stick is a standard USB-A one. If the Deck is still in storage mode, plug the official charger in as well (through the hub if you can) so it will actually wake up.
- With the Deck off, hold Volume Down, then press Power. When you hear the startup chime, let go of Volume Down.
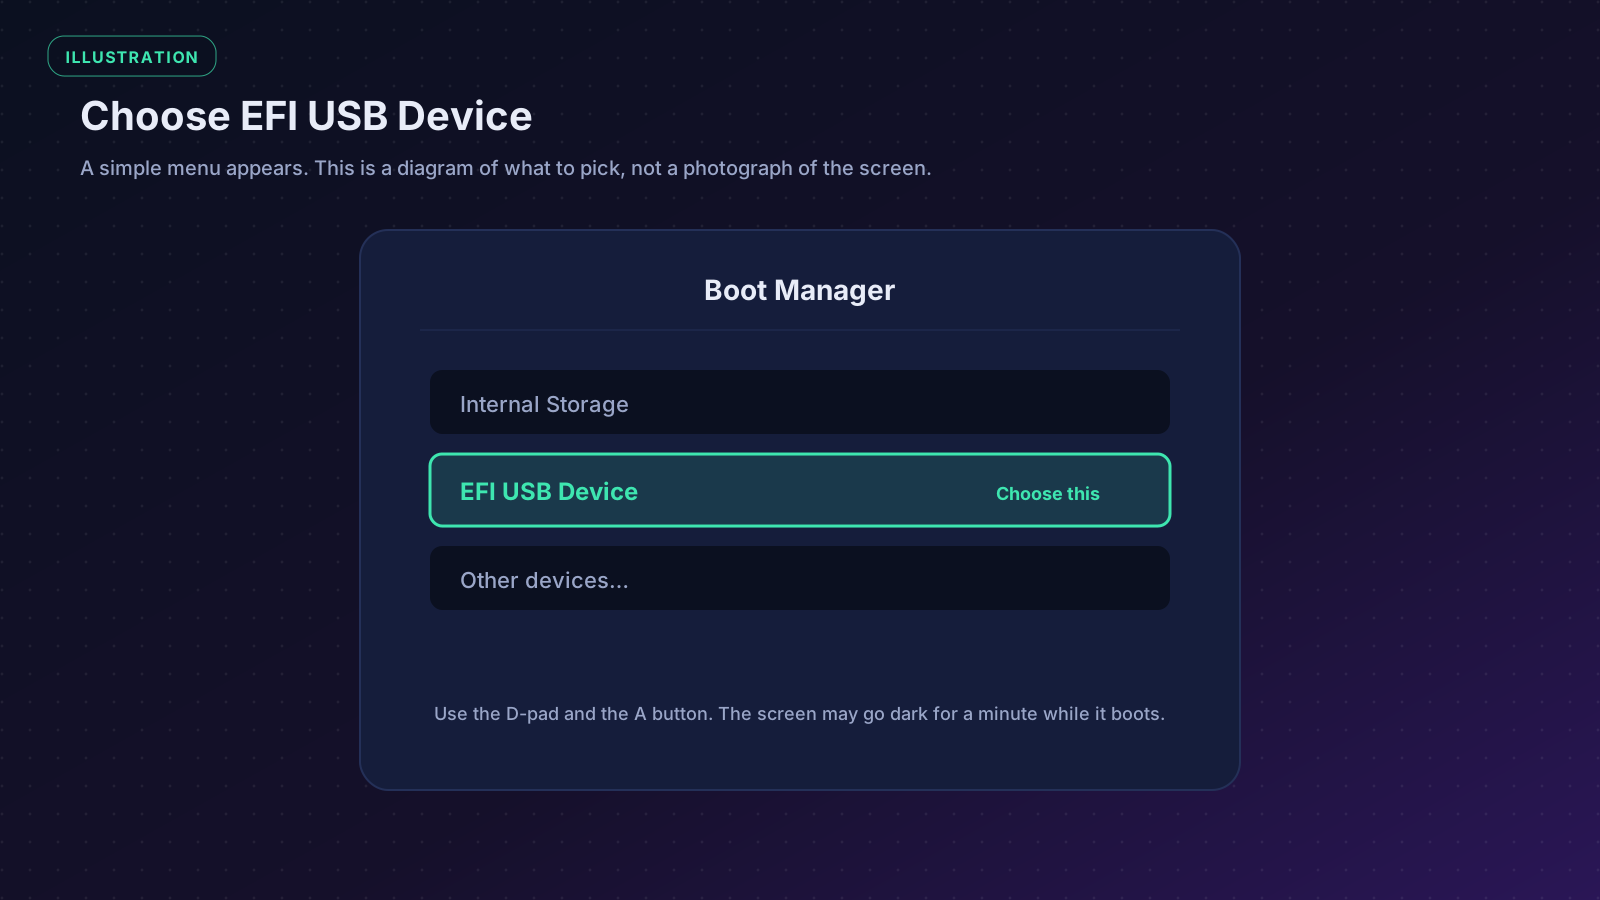
- You should see the Boot Manager. Choose EFI USB Device and press A.
- The screen may go dark for a minute while it boots from the stick. That's normal. You'll then get a SteamOS desktop (it's a simple Linux desktop, not the usual gaming interface). You can move around with the trackpads and the right trigger.
STEP 11Re-image Steam Deck
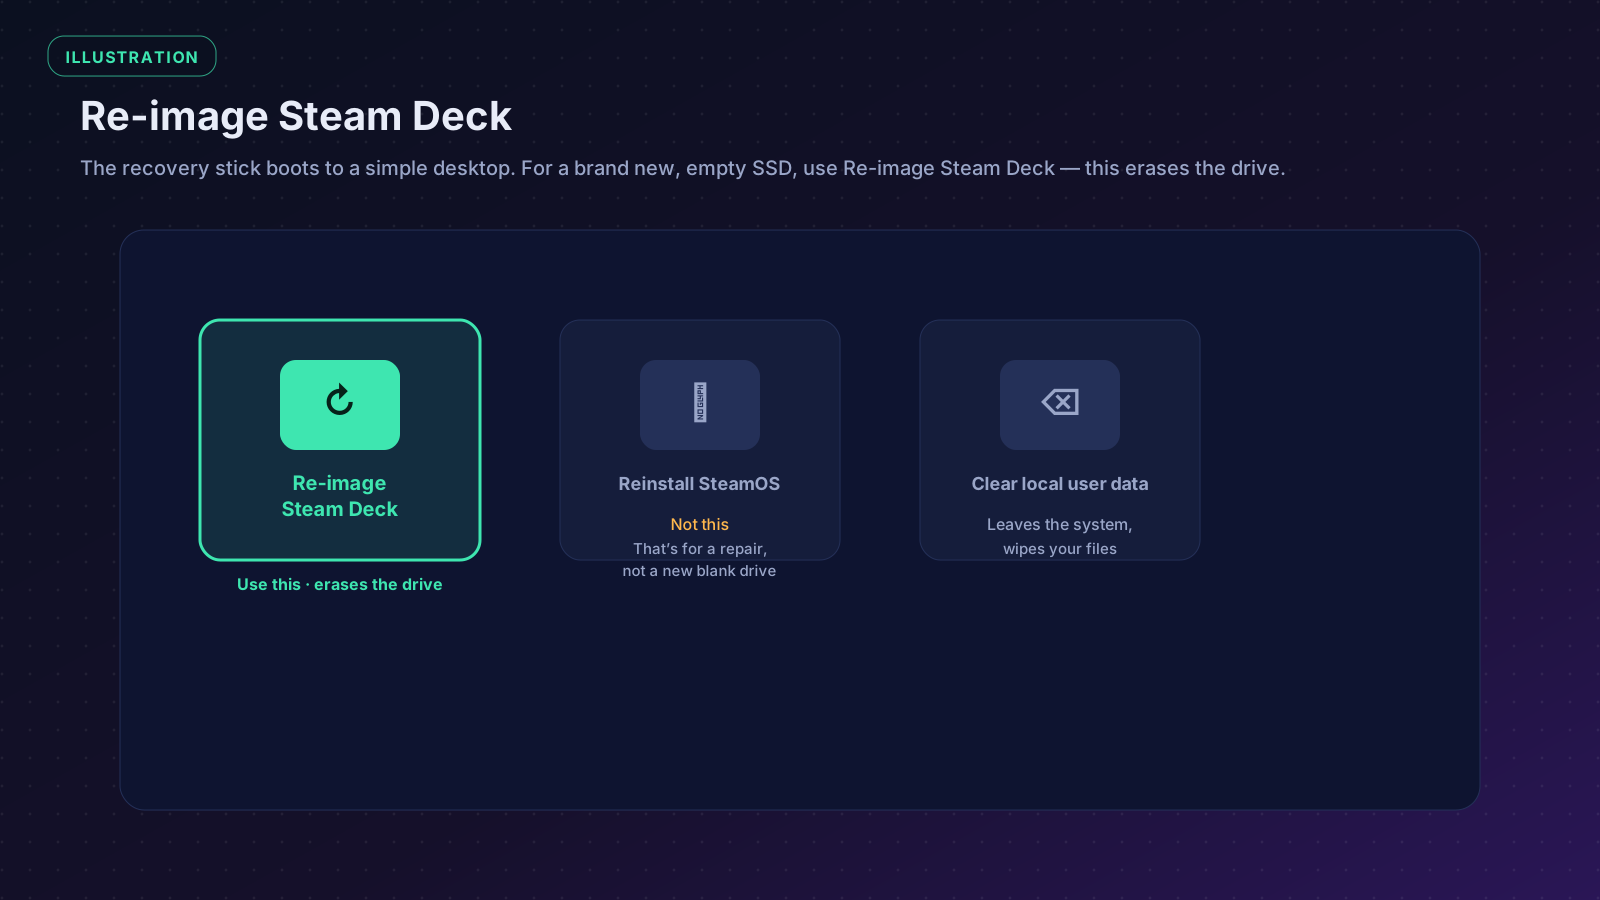
On the recovery desktop you'll see a few icons. For a brand new, empty SSD you want Re-image Steam Deck.
That option is a full factory install. It erases everything on the internal drive and puts a clean copy of SteamOS on it. That's the one to use after a drive swap.
The other options are easy to mix up, so don't click the first one you see:
- Reinstall SteamOS tries to reinstall the system while keeping games and personal files. That only makes sense when SteamOS is already on the drive and something has broken.
- Clear local user data wipes your files but leaves the system in place. Not what you want on a blank SSD.
Double-click Re-image Steam Deck, wait for the confirmation, and click Proceed. It will take a little while. Leave it alone until it finishes, then let the Deck restart when it asks.
STEP 12First boot
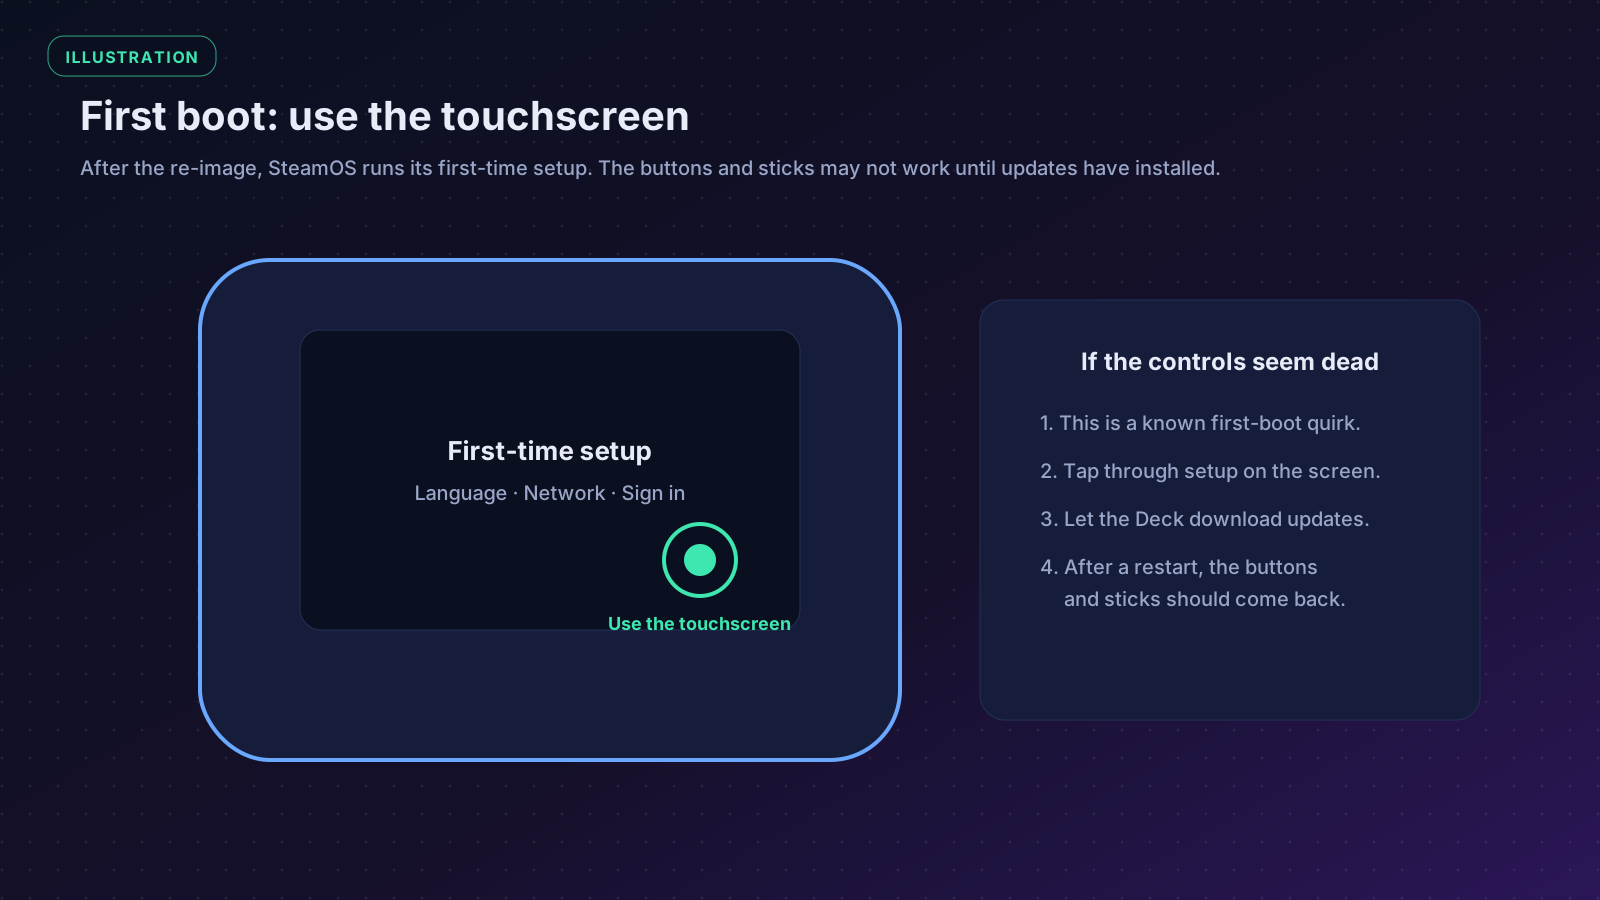
After the re-image, the Deck should boot into the usual first-time SteamOS setup: language, network, and signing in to Steam.
One quirk is worth knowing about, because it looks like a fault: the buttons, thumbsticks and touchpads may not work at first. Valve notes this after a re-image. Use the touchscreen to get through the setup and let the Deck download its updates. Once it restarts, the controls should come back.
Then you can install your games again, and you've got 1TB to put them on. I still keep a microSD card for leftovers, but the games I actually play now live on the internal drive, which is faster and more reliable.
Proof it worked
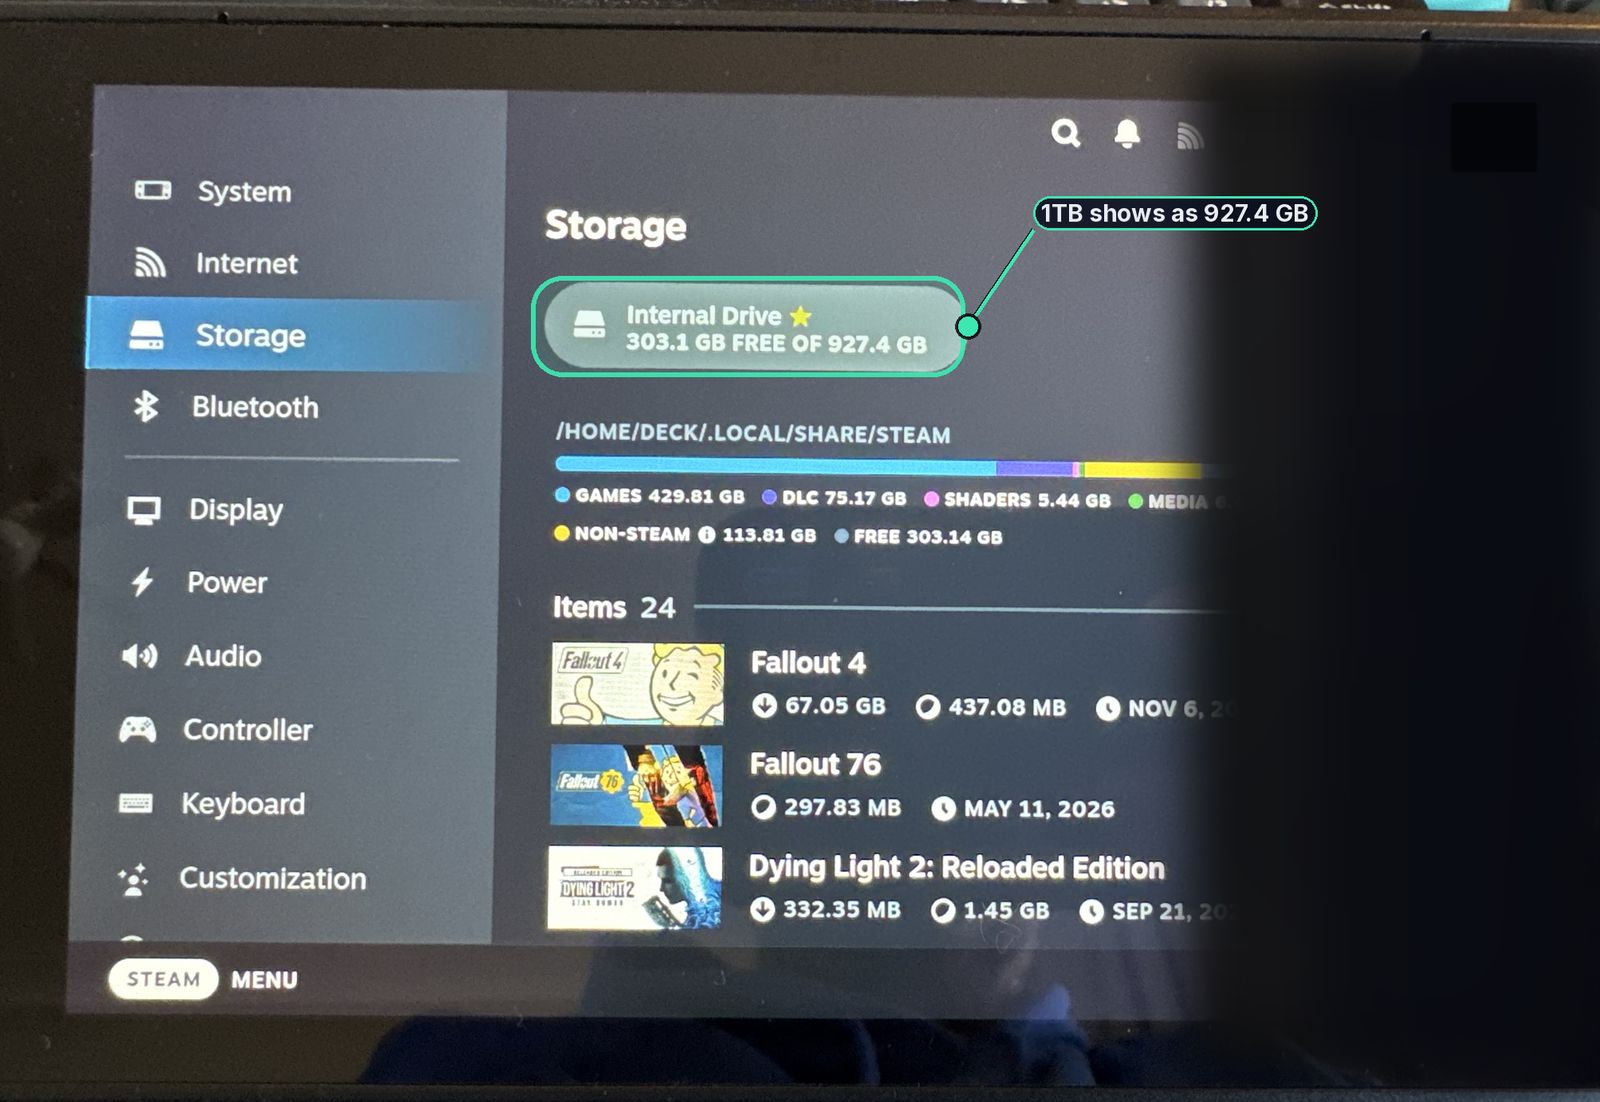
Once I was back in SteamOS, the Storage menu showed the new internal drive properly. It reports 303.1 GB free of 927.4 GB.
A 1TB drive usually shows up as about 930 GB, not a full 1,000 GB. Drive makers count a gigabyte as 1,000,000,000 bytes, while the system counts it as 1,073,741,824 bytes (a gibibyte). SteamOS and the filesystem also take a little space, so 927.4 GB is what you should expect from a 1TB card — not a fault, and not a smaller drive than the one you bought.
Troubleshooting
If something doesn't go to plan, try these before you panic. For more general "it won't turn on" checks, my Fix Common IT Issues checklist is a useful extra.
| Problem | What I'd try |
|---|---|
| The Deck will not turn on after storage mode | Plug in the official charger first. The power button is ignored until it has been on charge. |
| No Boot Manager, or it boots straight to a blank drive | Power off fully, hold Volume Down, then press Power, and release after the chime. Try a different USB stick or hub. |
| "EFI USB Device" doesn't appear | The stick may not have written properly. Try Rufus again, or write the image with balenaEtcher. Some hubs are picky; try another one, or a USB-C stick. |
| It boots to the recovery desktop but Re-image fails | Make sure the new SSD is fully seated and the screw is in, and that you used a single-sided 2230 NVMe, not a 2242. Then try the official image again. |
| Buttons and sticks don't work after the re-image | Use the touchscreen, let updates install, and restart. This is a known first-boot quirk. |
| A clip will not close, or the back sits proud | Take the shell off and check the shield and fan cable aren't sitting too high. Don't force the clips. |
| Wi-Fi seems weaker after the swap | Check you transferred the foil sleeve to the new drive. That shield helps with interference as well as static. |
| The Storage menu shows about 927 GB, not 1TB | That's normal. See the note above — drive makers and the system count a gigabyte differently. |
FAQ
Does this void the warranty? Opening the Deck and swapping the SSD shouldn't automatically void the warranty. Valve worked with iFixit on the official SSD guides, and the upgrade is a documented repair. What isn't covered is damage you cause while you're in there, such as a torn cable or a punctured battery. If something unrelated fails later, your UK consumer rights still apply, but I would keep the original 64GB module and put it back if you ever need to send the unit away. Read Valve's current hardware warranty as well, and don't take this as legal advice.
Why not just use a microSD card? A microSD card is the cheap, no-screwdriver option, and I still use one. It's fine for smaller or less-played games. An internal SSD is faster, more robust, and better for the games you actually load all the time. You can use both: big internal drive for the main library, microSD for the overflow.
Will a 2242 or 2280 SSD fit if I get an adapter? Not in the standard shell. The slot and the screw post are for a 2230 drive only. A 2242 is 12 mm too long and will not sit under the shield. I wouldn't start cutting shells or adding adapters unless you really know what you're doing.
Does the drive have to be single-sided? Yes, that's what Valve and iFixit specify. A double-sided 2230 can sit too tall and foul the shield. Most well-known 1TB 2230 drives, including the P310 and SN770M above, are single-sided. Watch this if you go for a 2TB card, where double-sided designs are more common.
Do I need to clone the old drive? No. For a 64GB-to-1TB jump, a fresh re-image is the straightforward method, and it's what Valve's recovery tools are for. Cloning is possible with a USB enclosure, but it's extra kit and extra fuss, and you still want a recovery USB in case something goes wrong.
Final thoughts
This was one of the more satisfying upgrades I've done. The 64GB model is the cheap way into a Steam Deck, and a 1TB 2230 SSD plus an afternoon's careful work turns it into the machine I actually wanted, without buying a new one. The camo back was the bonus: once you're in there, swapping the shell is the easy part.
If you've never opened a gadget like this before, read the safety section twice, use a plastic pick, and unplug the battery before you go near the drive. That's the whole job, really.
This is the first write-up in my Gadgets section: things I've actually bought and used, and what I learned along the way.